Age / Gender Detection
Age / Gender Detection
0. Introduction
- 사람의 얼굴 Image로 성별 / 나이대를 판별하는 Model은 상점 등과 같은 고객의 통계 정보를 필요로 하는 곳에 유용하게 사용할 수 있을 것 같아서 이 Project를 진행하게 되었습니다.
0.1. Face Detector
-
K-Face Dataset에서 사람 얼굴 부분만을 추출하기 위해서 Face Detector를 사용하여야 합니다.
- 여기서는 DNN Face Detector in OpenCV를 사용합니다.
-
Face Detector는 Input으로 Image를 넣어주면, 해당 Image에서 사람 얼굴이라고 판단되는 영역의 정보와 확신(신뢰)도를 값으로 Return해 줍니다.
- Face Detector Pre-Trained Model을 사용하기 위해서는 아래 2개의 File을 받아야 합니다.
- MODEL_FILE : opencv_face_detector_uint8.pb
- CONFIG_FILE : opencv_face_detector.pbtxt
-
속도도 빠르고 성능도 좋아서 Face Detection에 이 Module을 사용하도록 하겠습니다.
- 자세한 사용 방법은 이후 Code로 살펴보겠습니다.

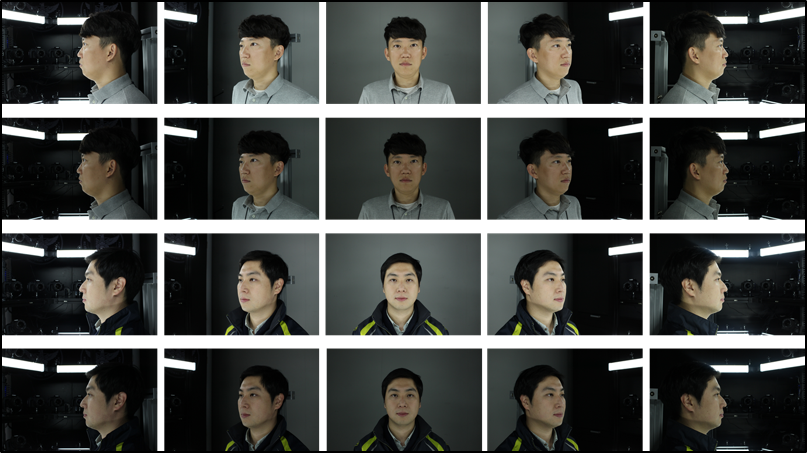
0.2. K-Face Dataset
-
K-Face Dataset는 AI Hub에서 제공하는 한국인 얼굴 Dataset입니다.
-
AI Hub는 한국지능정보사회진흥원이 운영하는 AI 통합 플랫폼이다.
-
2017년 AI 학습용 데이터 구축·확산 사업의 일환으로 AI 기술·서비스 개발에 필수적인 AI데이터, 소프트웨어, 컴퓨팅자원, 소재정보 등을 원스톱으로 제공하는 것을 목적으로 합니다.
-
K-Face Dataset의 자세한 정보는 https://github.com/k-face/k-face_2019에서 확인할 수 있습니다.
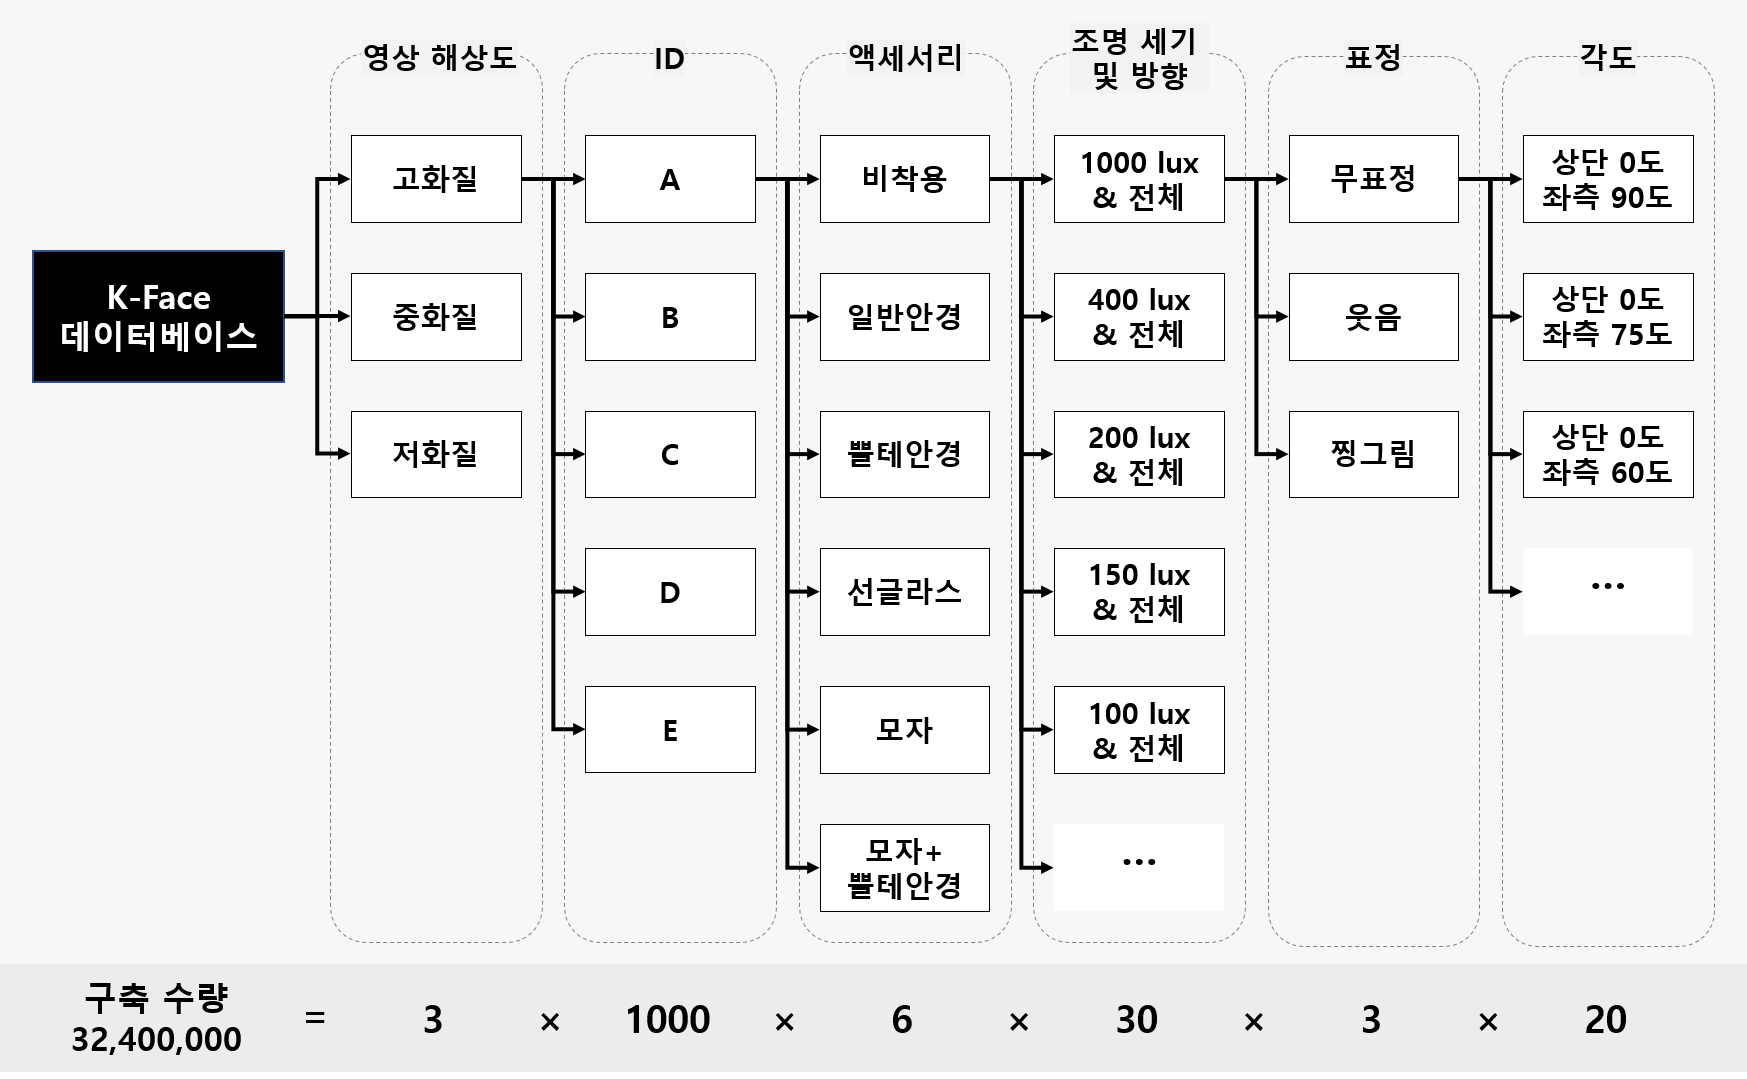
-
연령대별 / 성별 / 카메라 위치 / 액세사리 / 조명 / 표정 / 해상도 별로 다양하게 변경하면서 촬영한 얼굴 사진으로 구성되어 있습니다.
-
이 Dataset을 얻기 위해서는 별도의 신청서를 작성하여 담당자에게 제출하여야 하며, 승인이 나면 추후에 Download 가능한 Link를 받을 수 있습니다.
-
제가 사용한 K-Face Dataset에는 총 400명의 Image가 있었고, 이 중에 Train Data로써 사용할 수 없는 Image들은 사용하지 않도록 하겠습니다.
-
각 Image에는 고유 ID가 부여되여 있고, 별도의 Meta Data File에는 해당 ID의 연령대 / 성별 정보가 제공됩니다.
-
이를 활용하여 사진에 나오는 사람의 정보를 확인할 수 있고, 최종적으로 이를 이용하여 Train Data Set을 만들 것입니다.
1. Preprocessing
1.1. Prepare
- 필요한 Package를 Load합니다.
import numpy as np
import pandas as pd
import os
import glob
from tqdm import tqdm
import cv2
- 사진에서 얼굴 부분만을 추출하기 위해서 OpenCV DNN Face Detector를 사용하도록 하겠습니다.
MODEL_FILE = "opencv_face_detector_uint8.pb"
CONFIG_FILE = "opencv_face_detector.pbtxt"
- OpenCV DNN Face Detector 관련 상수를 정의합니다.
‘CONFIDENCE_FACE = 0.9’ - Face Detector가 제공해주는 값으로 추출한 얼굴 부분이 어느 정도 신뢰도가 있는지 나타내주는 값입니다.
SIZE = 300
CONFIDENCE_FACE = 0.9
‘MARGIN_RATIO = 0.2’
- OpenCV Face Detector는 얼굴 부분을 너무 Tight하게 Detect하는 경향이 있기 때문에, 상하좌우 약간의 Margin을 더 두어서 얼굴 부분으로 Detecr하도록 하겠습니다.
- 여기서는 20% 정도 더 여유롭게 얼굴부분으로 Detect하도록 합니다.
MARGIN_RAIO = 0.2
1.2. Select Appropriate Face Images
-
Train Data로 사용하지 못하는 사진의 경우에 미리 배제하도록 하겠습니다.
-
예를 들면, 선글라스 , 모자 등과 같이 얼굴을 많이 가리는 사진은 빼도록 하겠습니다.
-
적절한 밝기의 사진만 사용하고, 카메라 위치가 정면 얼굴을 찍지 않은 경우도 배제하고, 찡그린 얼굴 표정도 사용하지 않도록 하겠습니다.
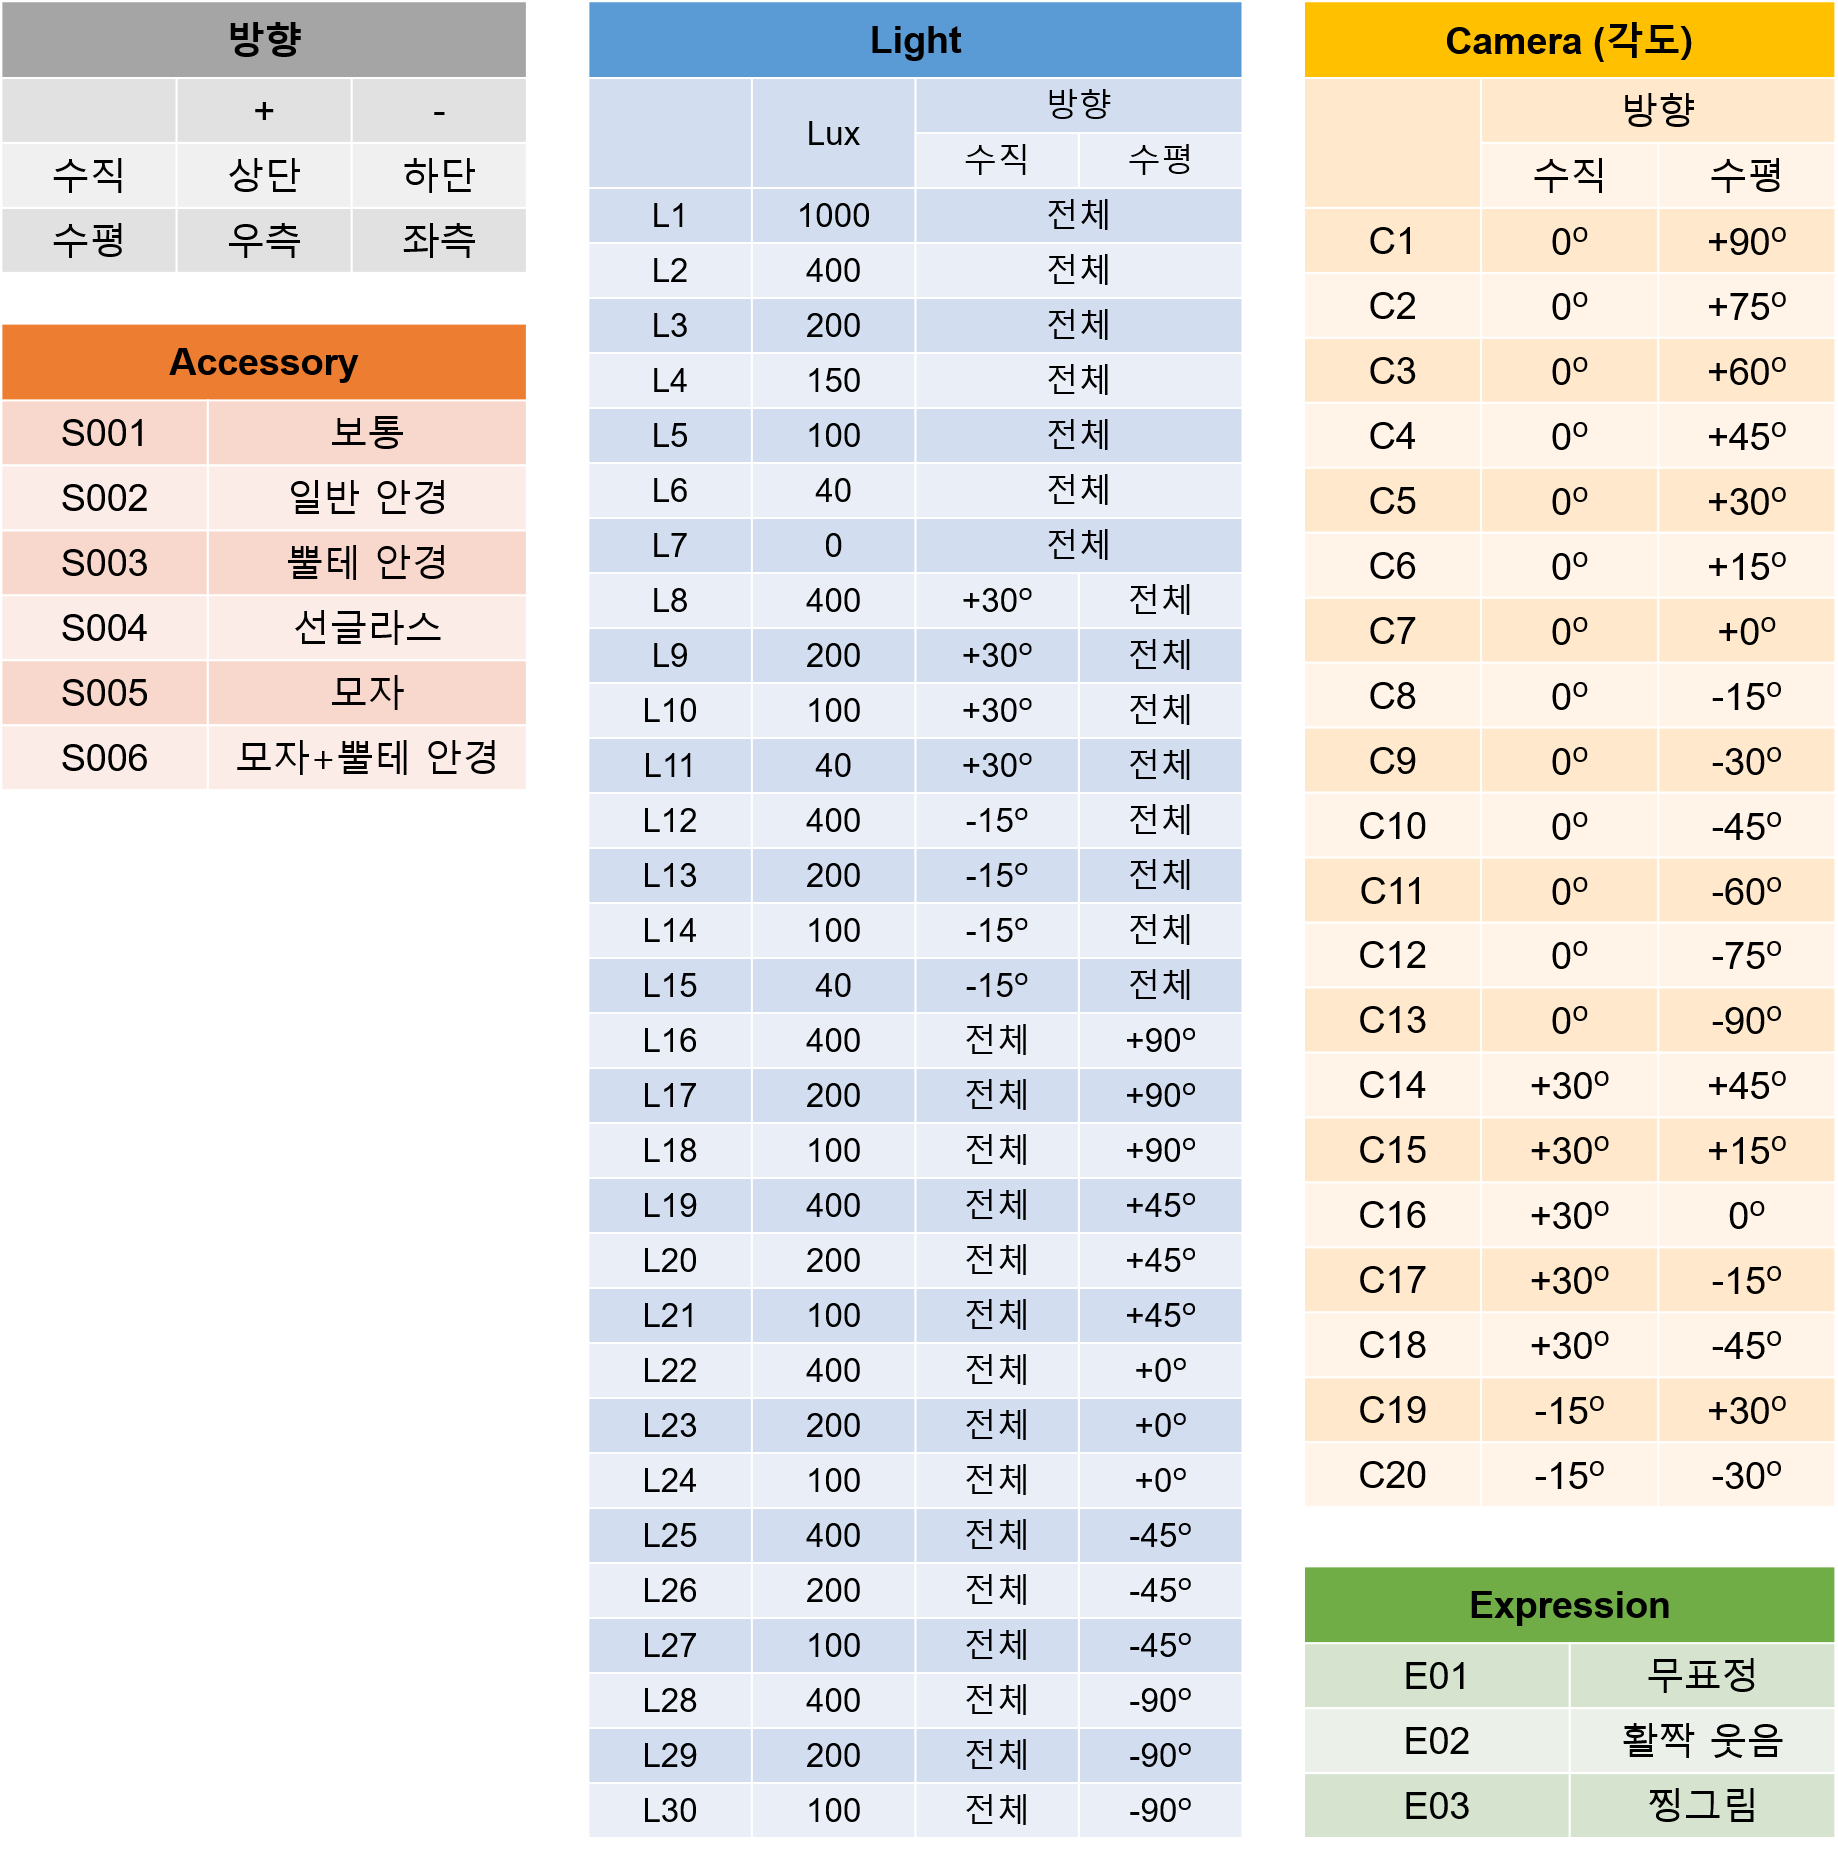
# 선글라스 , 모자 , 모자 + 뿔테안경을 착용한 경우는 모두 사용하지 않는다.
use_accessaries = ['S001' , 'S002' , 'S003']

# 적절한 밝기의 조명 사진만 사용한다
use_lights = ['L1' , 'L2' , 'L3' , 'L4' , 'L8' ,'L9' ,'L12' ,'L13' ,'L22']

# 얼굴이 제대로 보이지 않는 카메라 위치는 사용하지 않는다.
use_cam_pos = ['C4','C5','C6','C7','C8','C9','C10','C19','C20']

# 찡그린 표정의 사진은 사용하지 않는다.
use_looks = ['E01','E02']
dir_path = "../Dataset/High_Resolution"
data_file_path = []

def GetTrainDataFileList():
    for (root, directories, files) in tqdm(os.walk(dir_path)):
        for file in files:

            if '.jpg' in file:
                append = False

                file_path = os.path.join(root, file)
                for u in use_accessaries:
                    if u in str(file_path):
                        append = True
                        break

                if append:
                    append = False
                    for u in use_lights:
                        if u in str(file_path):
                            append = True
                            break

                if append:
                    append = False
                    for u in use_cam_pos:
                        if u in str(file_path):
                            append = True
                            break

                if append:
                    append = False
                    for u in use_looks:
                        if u in str(file_path):
                            append = True
                            break

                if append:
                    data_file_path.append( file_path )


    print( len(data_file_path) )

    meta_data = pd.DataFrame( data_file_path , columns=['file_path'])
    meta_data.to_csv("meta_data_K-Face.csv",index=False)
GetTrainDataFileList()
290801it [00:38, 7486.83it/s]


583200
- 총 32400000장의 Image중에 조건에 부합하는 583200장의 Image를 Train Data로 사용하겠습니다.
meta_data = pd.read_csv("meta_data_K-Face.csv")
1.3. Extract Face Location Information
-
선정한 Image File에서 얼굴부분에 대한 정보를 추출하도록 하겠습니다.
-
이 부분에서 OpenCV DNN Face Detector를 사용하도록 하겠습니다.
file_path = meta_data['file_path'].tolist()
len(file_path)
583200
- 신뢰도가 0.9 이상인 얼굴 부분만을 추출하여 상하좌우 여백을 추가하여 얼굴 위치 정보를 저장하도록 하겠습니다.
filename = []
left_list = []
right_list = []
top_list = []
bottom_list = []

net = cv2.dnn.readNetFromTensorflow( MODEL_FILE , CONFIG_FILE )

for file in tqdm(file_path):

    img = cv2.imread(file)
    rows, cols, channels = img.shape
    blob = cv2.dnn.blobFromImage(img, 1.0, (SIZE, SIZE))

    net.setInput(blob)
    detections = net.forward()

    for detection in detections[0, 0]:

        score = float(detection[2])

        if score > CONFIDENCE_FACE:

            if detection[3] >= 1.00 or detection[4] >= 1.00 or detection[5] >= 1.00 or detection[6] >= 1.00 or detection[3] <= 0 or detection[4] < 0 or detection[5] <= 0 or detection[6] <= 0:
                filename.append(np.NaN)
                left_list.append( np.NaN )
                right_list.append( np.NaN )
                top_list.append( np.NaN )
                bottom_list.append( np.NaN )

            else:
                left = int(detection[3] * cols)
                top = int(detection[4] * rows)
                right = int(detection[5] * cols)
                bottom = int(detection[6] * rows)

                left = left - int((right - left) * MARGIN_RAIO)
                top = top - int((bottom - top) * MARGIN_RAIO)
                right = right + int((right - left) * MARGIN_RAIO)
                bottom = bottom + int((bottom - top) * MARGIN_RAIO / 2)

                if left < 0:
                    left = 0

                if right > cols:
                    right = cols

                if top < 0:
                    top = 0

                if bottom > rows:
                    bottom = rows

                filename.append(file)
                left_list.append( left )
                right_list.append( right )
                top_list.append( top )
                bottom_list.append( bottom )
100%|????????????????????????????????????????????????????????????????????????| 583200/583200 [4:05:05<00:00, 39.66it/s]
- 추후에 Train에 사용하기 위해서 각 Image에서 얼굴부분의 위치를 저장합니다.
coor = pd.DataFrame( list(zip(filename , left_list , right_list , top_list , bottom_list)) , columns=['file_path' , 'left' , 'right' , 'top' , 'bottom'] )
coor.head()
| file_path | left | right | top | bottom | |
|---|---|---|---|---|---|
| 0 | ../Dataset/High_Resolution\19062421\S001\L1\E0... | 289 | 491 | 155 | 402 |
| 1 | ../Dataset/High_Resolution\19062421\S001\L1\E0... | 377 | 581 | 175 | 392 |
| 2 | ../Dataset/High_Resolution\19062421\S001\L1\E0... | 313 | 502 | 181 | 401 |
| 3 | ../Dataset/High_Resolution\19062421\S001\L1\E0... | 394 | 602 | 142 | 407 |
| 4 | ../Dataset/High_Resolution\19062421\S001\L1\E0... | 373 | 589 | 142 | 403 |
coor.info()
<class 'pandas.core.frame.DataFrame'>
RangeIndex: 365672 entries, 0 to 365671
Data columns (total 5 columns):
 #   Column     Non-Null Count   Dtype
---  ------     --------------   -----
 0   file_path  365672 non-null  object
 1   left       365672 non-null  int64
 2   right      365672 non-null  int64
 3   top        365672 non-null  int64
 4   bottom     365672 non-null  int64
dtypes: int64(4), object(1)
memory usage: 13.9+ MB
coor.to_csv("coor.csv" , index=False)
1.4. Additional Information
-
마지막으로, 각 사진에 나오는 사람의 연령대 / 성별 정보도 추가합니다.
-
이 정보는 Train시에 Label 정보로 이용합니다.
-
ID는 File Path에서 얻을 수 있으므로, File Path에서 ID만 추출해서 새 Column을 만듭니다.
def get_ID(file_path):
    ID = str(file_path)[27:35]
    return int(ID)
coor.head()
| file_path | left | right | top | bottom | |
|---|---|---|---|---|---|
| 0 | ../Dataset/High_Resolution\19062421\S001\L1\E0... | 289 | 491 | 155 | 402 |
| 1 | ../Dataset/High_Resolution\19062421\S001\L1\E0... | 377 | 581 | 175 | 392 |
| 2 | ../Dataset/High_Resolution\19062421\S001\L1\E0... | 313 | 502 | 181 | 401 |
| 3 | ../Dataset/High_Resolution\19062421\S001\L1\E0... | 394 | 602 | 142 | 407 |
| 4 | ../Dataset/High_Resolution\19062421\S001\L1\E0... | 373 | 589 | 142 | 403 |
coor['ID'] = coor['file_path'].apply(get_ID)
- 이 ID값을 Key로 하여 연령대 / 성별 정보를 추가합니다.
coor.head()
| file_path | left | right | top | bottom | ID | |
|---|---|---|---|---|---|---|
| 0 | ../Dataset/High_Resolution\19062421\S001\L1\E0... | 289 | 491 | 155 | 402 | 19062421 |
| 1 | ../Dataset/High_Resolution\19062421\S001\L1\E0... | 377 | 581 | 175 | 392 | 19062421 |
| 2 | ../Dataset/High_Resolution\19062421\S001\L1\E0... | 313 | 502 | 181 | 401 | 19062421 |
| 3 | ../Dataset/High_Resolution\19062421\S001\L1\E0... | 394 | 602 | 142 | 407 | 19062421 |
| 4 | ../Dataset/High_Resolution\19062421\S001\L1\E0... | 373 | 589 | 142 | 403 | 19062421 |
coor.info()
<class 'pandas.core.frame.DataFrame'>
RangeIndex: 365672 entries, 0 to 365671
Data columns (total 6 columns):
 #   Column     Non-Null Count   Dtype
---  ------     --------------   -----
 0   file_path  365672 non-null  object
 1   left       365672 non-null  int64
 2   right      365672 non-null  int64
 3   top        365672 non-null  int64
 4   bottom     365672 non-null  int64
 5   ID         365672 non-null  int64
dtypes: int64(5), object(1)
memory usage: 16.7+ MB
- 연령 / 성별 정보는 별도의 File로 제공됩니다.
- 이 File에는 ID값으로 연령 / 성별을 알 수 있습니다.
additional_info = pd.read_csv("KFace_data_information_Folder1_400.csv",encoding='CP949')
additional_info = additional_info[['ID','연령대','성별']]
print(additional_info.head())
print(additional_info.info())
         ID  연령대 성별
0  19062421  30대  남
1  19062431  40대  남
2  19062521  50대  여
3  19062531  40대  여
4  19062542  30대  여
<class 'pandas.core.frame.DataFrame'>
RangeIndex: 400 entries, 0 to 399
Data columns (total 3 columns):
 #   Column  Non-Null Count  Dtype
---  ------  --------------  -----
 0   ID      400 non-null    int64
 1   연령대     400 non-null    object
 2   성별      400 non-null    object
dtypes: int64(1), object(2)
memory usage: 9.5+ KB
None
- ID값을 Key로하여 연령대 / 성별 정보를 추가합니다.
merged_meta_data = pd.merge(coor,
         additional_info,
         how='left',
         on='ID'
        )
merged_meta_data.tail()
| file_path | left | right | top | bottom | ID | 연령대 | 성별 | |
|---|---|---|---|---|---|---|---|---|
| 365667 | ../Dataset/High_Resolution\19101513\S003\L9\E0... | 323 | 635 | 101 | 470 | 19101513 | 20대 | 여 |
| 365668 | ../Dataset/High_Resolution\19101513\S003\L9\E0... | 305 | 600 | 101 | 466 | 19101513 | 20대 | 여 |
| 365669 | ../Dataset/High_Resolution\19101513\S003\L9\E0... | 282 | 577 | 101 | 467 | 19101513 | 20대 | 여 |
| 365670 | ../Dataset/High_Resolution\19101513\S003\L9\E0... | 260 | 557 | 100 | 472 | 19101513 | 20대 | 여 |
| 365671 | ../Dataset/High_Resolution\19101513\S003\L9\E0... | 231 | 537 | 96 | 474 | 19101513 | 20대 | 여 |
- 최종 결과물을 Train시에 사용할 수 있도록 저장합니다.
merged_meta_data.to_csv('meta_data_face_coor_K-Face.csv' , index=False)
2. Train
- Preprocessing을 거쳐서 얻어진 얼굴 사진 / 연령 / 성별 정보를 이용하여 Model을 Train 시킵니다.
2.1. Prepare Train / Val. Dataset
from numpy.lib.function_base import average
import pandas as pd
import os
import numpy as np
from sklearn.preprocessing import LabelEncoder
from sklearn.model_selection import train_test_split
import matplotlib.pyplot as plt
import tensorflow_addons as tfa
import tensorflow as tf
from tensorflow.keras.models import Sequential
from tensorflow.keras.layers import GlobalAveragePooling2D , BatchNormalization , Dropout , Dense
from tensorflow.keras.callbacks import TensorBoard , ModelCheckpoint , LearningRateScheduler , EarlyStopping
BATCH_SIZE = 32
DROP_OUT_RATE = 0.2
- Preprocess 작업에서 얻은 결과물을 읽어옵니다.
dataset_info = pd.read_csv("meta_data_face_coor_K-Face.csv")
dataset_info
| file_path | left | right | top | bottom | ID | 연령대 | 성별 | |
|---|---|---|---|---|---|---|---|---|
| 0 | ../Dataset/High_Resolution\19062421\S001\L1\E0... | 289 | 491 | 155 | 402 | 19062421 | 30대 | 남 |
| 1 | ../Dataset/High_Resolution\19062421\S001\L1\E0... | 377 | 581 | 175 | 392 | 19062421 | 30대 | 남 |
| 2 | ../Dataset/High_Resolution\19062421\S001\L1\E0... | 313 | 502 | 181 | 401 | 19062421 | 30대 | 남 |
| 3 | ../Dataset/High_Resolution\19062421\S001\L1\E0... | 394 | 602 | 142 | 407 | 19062421 | 30대 | 남 |
| 4 | ../Dataset/High_Resolution\19062421\S001\L1\E0... | 373 | 589 | 142 | 403 | 19062421 | 30대 | 남 |
| ... | ... | ... | ... | ... | ... | ... | ... | ... |
| 365667 | ../Dataset/High_Resolution\19101513\S003\L9\E0... | 323 | 635 | 101 | 470 | 19101513 | 20대 | 여 |
| 365668 | ../Dataset/High_Resolution\19101513\S003\L9\E0... | 305 | 600 | 101 | 466 | 19101513 | 20대 | 여 |
| 365669 | ../Dataset/High_Resolution\19101513\S003\L9\E0... | 282 | 577 | 101 | 467 | 19101513 | 20대 | 여 |
| 365670 | ../Dataset/High_Resolution\19101513\S003\L9\E0... | 260 | 557 | 100 | 472 | 19101513 | 20대 | 여 |
| 365671 | ../Dataset/High_Resolution\19101513\S003\L9\E0... | 231 | 537 | 96 | 474 | 19101513 | 20대 | 여 |
365672 rows × 8 columns
- 성별 / 연령대 값을 One-Hot Encoding하기 위해 Label Encoder를 준비합니다.
gender = dataset_info['성별'].tolist()

le_gender = LabelEncoder()
le_gender.fit(gender)
print(le_gender.classes_)
['남' '여']
age_band = dataset_info['연령대'].tolist()

le_age_band = LabelEncoder()
le_age_band.fit(age_band)
print(le_age_band.classes_)
['20대' '30대' '40대' '50대']
2.2. Split Train / Val. Dataset
-
이 Model에서 분류하고자 하는 것은 연령대와 성별입니다.
-
연령대와 성별, 각각을 분류하는 Model을 만들수도 있습니다만, 얼굴 사진에서 Feature를 뽑아내는 과정은 2개의 Model이 동일할 것으로 생각됩니다.
-
어차피 동일한 Feature를 가지고 2개 Model을 만들기 보다는 Functional API를 사용하여 2개의 Output을 가지는 Model 하나를 만드는 것이 더 효율적일 것 같습니다.
-
이런 경우에, 연령대 / 성별을 적절한 비율로 가진 Train / Val. Dataset을 분류하는 것이 관건인데, 이를 위해 약간의 Trick을 사용하도록 하겠습니다.
-
우선 2개의 Label(연령/성별)을 하나로 합쳐서 새로운 Label을 만듭니다. 그러면, 총 8개의 Label( 남,여 x 20,30,40,50 )을 가지는 새로운 Label이 생깁니다.
-
이 새로운 Label을 가지고 train_test_split으로 분류하면 동일한 비율로 Train / Val. Dataset을 나눌 수 있습니다.
-
실제 Train시에는 새로운 Label아닌 원래 연령대 / 성별을 이용합니다.
data_file_path = dataset_info[['file_path' , 'left' , 'right' , 'top' , 'bottom' , '연령대' , '성별']]
- 연령대 / 성별을 합친 새로운 ‘merged_class’ Label을 만듭니다.
dataset_info['merged_class'] = dataset_info['연령대']+dataset_info['성별']
dataset_info['merged_class']
0         30대남
1         30대남
2         30대남
3         30대남
4         30대남
          ...
365667    20대여
365668    20대여
365669    20대여
365670    20대여
365671    20대여
Name: merged_class, Length: 365672, dtype: object
- ‘merged_class’은 아래와 같은 비율로 이루어져 있네요.
dataset_info['merged_class'].value_counts()
40대남    80106
30대여    67909
30대남    60042
50대남    52349
40대여    51619
50대여    41387
20대여     7175
20대남     5085
Name: merged_class, dtype: int64
- ‘merged_class’로 One-Hot으로 나누고, train_test_split으로 동일 비율로 나눕니다.
merged_class = dataset_info['merged_class'].tolist()
le_merged_class = LabelEncoder()
le_merged_class.fit(merged_class)
print(le_merged_class.classes_)
merged_class = le_merged_class.transform(merged_class)
merged_class = tf.keras.utils.to_categorical(merged_class , num_classes=8)
['20대남' '20대여' '30대남' '30대여' '40대남' '40대여' '50대남' '50대여']
file_path_train, file_path_val, y_train, y_val = train_test_split(data_file_path, merged_class,
                                                                  test_size=0.25,
                                                                  random_state=777,
                                                                  stratify = merged_class)
print( len(file_path_train) , len(y_train) , len(file_path_val) , len(y_val) )
274254 274254 91418 91418
file_path_train
| file_path | left | right | top | bottom | 연령대 | 성별 | |
|---|---|---|---|---|---|---|---|
| 77525 | ../Dataset/High_Resolution\19071841\S002\L21\E... | 261 | 528 | 111 | 468 | 30대 | 여 |
| 79566 | ../Dataset/High_Resolution\19071912\S002\L9\E0... | 361 | 661 | 104 | 473 | 50대 | 여 |
| 230772 | ../Dataset/High_Resolution\19090341\S001\L14\E... | 277 | 557 | 122 | 441 | 40대 | 여 |
| 273268 | ../Dataset/High_Resolution\19091733\S001\L2\E0... | 260 | 534 | 104 | 415 | 50대 | 남 |
| 219897 | ../Dataset/High_Resolution\19083042\S003\L4\E0... | 335 | 612 | 127 | 448 | 50대 | 여 |
| ... | ... | ... | ... | ... | ... | ... | ... |
| 224863 | ../Dataset/High_Resolution\19090311\S001\L15\E... | 237 | 532 | 121 | 452 | 30대 | 여 |
| 179967 | ../Dataset/High_Resolution\19082142\S002\L24\E... | 257 | 527 | 101 | 439 | 30대 | 여 |
| 85366 | ../Dataset/High_Resolution\19072221\S003\L4\E0... | 238 | 520 | 90 | 455 | 40대 | 여 |
| 180009 | ../Dataset/High_Resolution\19082142\S002\L29\E... | 274 | 528 | 89 | 469 | 30대 | 여 |
| 55958 | ../Dataset/High_Resolution\19071242\S003\L1\E0... | 320 | 603 | 116 | 453 | 40대 | 여 |
274254 rows × 7 columns
- 이제 나누어진 Train / Val.로 tf.Dataset을 만듭니다.
train_left = file_path_train['left'].tolist()
train_right = file_path_train['right'].tolist()
train_top = file_path_train['top'].tolist()
train_bottom = file_path_train['bottom'].tolist()
train_file_path = file_path_train['file_path'].tolist()
age_band = file_path_train['연령대'].tolist()

age_band = le_age_band.transform(age_band)
train_age_band = tf.keras.utils.to_categorical(age_band , num_classes=4)
train_age_band
array([[0., 1., 0., 0.],
       [0., 0., 0., 1.],
       [0., 0., 1., 0.],
       ...,
       [0., 0., 1., 0.],
       [0., 1., 0., 0.],
       [0., 0., 1., 0.]], dtype=float32)
gender = file_path_train['성별'].tolist()

gender = le_gender.transform(gender)
train_gender = tf.keras.utils.to_categorical(gender , num_classes=2)
train_gender
array([[0., 1.],
       [0., 1.],
       [0., 1.],
       ...,
       [0., 1.],
       [0., 1.],
       [0., 1.]], dtype=float32)
val_left = file_path_val['left'].tolist()
val_right = file_path_val['right'].tolist()
val_top = file_path_val['top'].tolist()
val_bottom = file_path_val['bottom'].tolist()
val_file_path = file_path_val['file_path'].tolist()
age_band = file_path_val['연령대'].tolist()

age_band = le_age_band.transform(age_band)
val_age_band = tf.keras.utils.to_categorical(age_band , num_classes=4)
val_age_band
array([[0., 1., 0., 0.],
       [0., 0., 0., 1.],
       [0., 0., 1., 0.],
       ...,
       [0., 1., 0., 0.],
       [0., 0., 1., 0.],
       [0., 1., 0., 0.]], dtype=float32)
gender = file_path_val['성별'].tolist()

gender = le_gender.transform(gender)
val_gender = tf.keras.utils.to_categorical(gender , num_classes=2)
val_gender
array([[0., 1.],
       [1., 0.],
       [0., 1.],
       ...,
       [0., 1.],
       [1., 0.],
       [0., 1.]], dtype=float32)
-
Map function입니다.
-
Image를 읽어서 얼굴 부분만을 잘라내서 ResNet Input Format으로 변환합니다.
-
또 하나 주목할 점은 Train시킬 Model은 2개의 Label을 학습해야 하므로 (label_gender , label_age_band) 와 같이 2개의 Label을 Return합니다.
def load_image( image_path , left , right , top , bottom , label_age_band , label_gender ):
    img = tf.io.read_file(image_path)
    img = tf.image.decode_jpeg(img, channels=3)
    img = tf.image.crop_to_bounding_box( img , top , left, bottom - top , right - left )

    img = tf.image.resize(img, (224, 224))
    img = tf.keras.applications.resnet50.preprocess_input(img)

    return img , (label_gender , label_age_band)
train_dataset = tf.data.Dataset.from_tensor_slices( (train_file_path ,
                                                     train_left ,
                                                     train_right ,
                                                     train_top ,
                                                     train_bottom ,
                                                     train_age_band,
                                                     train_gender) )
val_dataset = tf.data.Dataset.from_tensor_slices( (val_file_path ,
                                                   val_left ,
                                                   val_right ,
                                                   val_top ,
                                                   val_bottom ,
                                                   val_age_band,
                                                   val_gender) )
train_dataset = train_dataset.shuffle(buffer_size=len(train_file_path))\
                                        .map( load_image, num_parallel_calls=tf.data.experimental.AUTOTUNE)\
                                        .batch(BATCH_SIZE)\
                                        .prefetch(tf.data.experimental.AUTOTUNE)
val_dataset = val_dataset.shuffle(buffer_size=len(val_file_path))\
                            .map( load_image, num_parallel_calls=tf.data.experimental.AUTOTUNE)\
                            .batch(BATCH_SIZE)\
                            .prefetch(tf.data.experimental.AUTOTUNE)
2.3. Build Model
-
2개의 Label에 대한 학습을 해야하기 때문에 Sequential Model이 아닌 Functional API를 사용한 Model을 만들도록 하겠습니다.
-
Input은 ResNet Input Format에 맞게 만듭니다.
input = tf.keras.Input(shape=(224, 224, 3), name="input")
- Feature Extractor로 ResNet을 사용하도록 하겠습니다.
r = tf.keras.applications.resnet.ResNet50(
    weights=None,
    input_shape=(224, 224, 3),
    include_top=False)(input)
- 그 이후에 일반적인 Dense Layer들을 추가합니다.
g = GlobalAveragePooling2D()(r)
g = Dropout(DROP_OUT_RATE)(g)
g = BatchNormalization()(g)
g = Dense(128,activation="relu")(g)
g = Dropout(DROP_OUT_RATE)(g)
g = BatchNormalization()(g)
- 마지막으로, 2개의 출력에 대한 Dense Layer도 추가합니다.
output_gender = Dense(2, activation='softmax' , name="output_gender")(g)
output_age_band = Dense(4, activation='softmax' , name="output_age_band")(g)
- 위에서 만든 Input / Output들로 Model을 만듭니다.
model = tf.keras.Model(
    inputs=input,
    outputs=[output_gender, output_age_band],
)
model.summary()
Model: "model"
__________________________________________________________________________________________________
Layer (type)                    Output Shape         Param #     Connected to
==================================================================================================
input (InputLayer)              [(None, 224, 224, 3) 0
__________________________________________________________________________________________________
resnet50 (Functional)           (None, 7, 7, 2048)   23587712    input[0][0]
__________________________________________________________________________________________________
global_average_pooling2d (Globa (None, 2048)         0           resnet50[0][0]
__________________________________________________________________________________________________
dropout (Dropout)               (None, 2048)         0           global_average_pooling2d[0][0]
__________________________________________________________________________________________________
batch_normalization (BatchNorma (None, 2048)         8192        dropout[0][0]
__________________________________________________________________________________________________
dense (Dense)                   (None, 128)          262272      batch_normalization[0][0]
__________________________________________________________________________________________________
dropout_1 (Dropout)             (None, 128)          0           dense[0][0]
__________________________________________________________________________________________________
batch_normalization_1 (BatchNor (None, 128)          512         dropout_1[0][0]
__________________________________________________________________________________________________
output_gender (Dense)           (None, 2)            258         batch_normalization_1[0][0]
__________________________________________________________________________________________________
output_age_band (Dense)         (None, 4)            516         batch_normalization_1[0][0]
==================================================================================================
Total params: 23,859,462
Trainable params: 23,801,990
Non-trainable params: 57,472
__________________________________________________________________________________________________
2.4. Callbacks
- 필요한 Callback들을 정의합니다.
initial_learning_rate = 0.01

def lr_exp_decay(epoch, lr):
    k = 0.1
    return initial_learning_rate * np.math.exp(-k*epoch)

lr_scheduler = LearningRateScheduler(lr_exp_decay, verbose=1)
log_dir = os.path.join('Logs')
CHECKPOINT_PATH = os.path.join('CheckPoints_K-Face_Gender_Age_Band_F1_Score')
tb_callback = TensorBoard(log_dir=log_dir)
cp = ModelCheckpoint(filepath=CHECKPOINT_PATH,
                     monitor='val_output_age_band_accuracy',
                     #monitor='val_F1_metric',
                     save_best_only = True,
                     verbose = 1)
es = EarlyStopping(monitor = 'val_output_age_band_loss', patience = 2, mode = 'auto')
F1_metric = tfa.metrics.F1Score(num_classes=2 , average=None)
- Model Compile시에 2개의 Output에 각각 Loss / Metric을 지정해 줄 수 있습니다.
model.compile(
    optimizer=tf.keras.optimizers.Adam(1e-3),

    loss={'output_gender':'binary_crossentropy',
          'output_age_band':'categorical_crossentropy'},

    metrics={'output_gender':'accuracy' ,
             'output_age_band' : 'accuracy'}
)
- 이제 모든 준비가 끝났으니 Train을 시작합니다.
hist = model.fit(train_dataset,
                 validation_data=val_dataset,
                 callbacks=[lr_scheduler , cp , tb_callback , es],
                 epochs = 10,
                 verbose = 1
                )
C:\Users\Moon\anaconda3\envs\TF.2.5.0-GPU\lib\site-packages\tensorflow\python\keras\utils\generic_utils.py:494: CustomMaskWarning: Custom mask layers require a config and must override get_config. When loading, the custom mask layer must be passed to the custom_objects argument.
  warnings.warn('Custom mask layers require a config and must override '


Epoch 1/10

Epoch 00001: LearningRateScheduler reducing learning rate to 0.01.
8571/8571 [==============================] - 1378s 160ms/step - loss: 1.2292 - output_gender_loss: 0.2243 - output_age_band_loss: 1.0049 - output_gender_accuracy: 0.8933 - output_age_band_accuracy: 0.5337 - val_loss: 1.0698 - val_output_gender_loss: 0.1136 - val_output_age_band_loss: 0.9562 - val_output_gender_accuracy: 0.9571 - val_output_age_band_accuracy: 0.6229

Epoch 00001: val_output_age_band_accuracy improved from -inf to 0.62286, saving model to CheckPoints_K-Face_Gender_Age_Band_F1_Score


C:\Users\Moon\anaconda3\envs\TF.2.5.0-GPU\lib\site-packages\tensorflow\python\keras\utils\generic_utils.py:494: CustomMaskWarning: Custom mask layers require a config and must override get_config. When loading, the custom mask layer must be passed to the custom_objects argument.
  warnings.warn('Custom mask layers require a config and must override '


INFO:tensorflow:Assets written to: CheckPoints_K-Face_Gender_Age_Band_F1_Score\assets
Epoch 2/10

Epoch 00002: LearningRateScheduler reducing learning rate to 0.009048374180359595.
8571/8571 [==============================] - 1384s 161ms/step - loss: 0.5148 - output_gender_loss: 0.0518 - output_age_band_loss: 0.4629 - output_gender_accuracy: 0.9817 - output_age_band_accuracy: 0.8172 - val_loss: 0.4605 - val_output_gender_loss: 0.0664 - val_output_age_band_loss: 0.3941 - val_output_gender_accuracy: 0.9782 - val_output_age_band_accuracy: 0.8418

Epoch 00002: val_output_age_band_accuracy improved from 0.62286 to 0.84179, saving model to CheckPoints_K-Face_Gender_Age_Band_F1_Score


C:\Users\Moon\anaconda3\envs\TF.2.5.0-GPU\lib\site-packages\tensorflow\python\keras\utils\generic_utils.py:494: CustomMaskWarning: Custom mask layers require a config and must override get_config. When loading, the custom mask layer must be passed to the custom_objects argument.
  warnings.warn('Custom mask layers require a config and must override '


INFO:tensorflow:Assets written to: CheckPoints_K-Face_Gender_Age_Band_F1_Score\assets
Epoch 3/10

Epoch 00003: LearningRateScheduler reducing learning rate to 0.008187307530779819.
8571/8571 [==============================] - 1382s 161ms/step - loss: 0.2292 - output_gender_loss: 0.0267 - output_age_band_loss: 0.2025 - output_gender_accuracy: 0.9906 - output_age_band_accuracy: 0.9262 - val_loss: 0.6303 - val_output_gender_loss: 0.0726 - val_output_age_band_loss: 0.5578 - val_output_gender_accuracy: 0.9743 - val_output_age_band_accuracy: 0.8105

Epoch 00003: val_output_age_band_accuracy did not improve from 0.84179
Epoch 4/10

Epoch 00004: LearningRateScheduler reducing learning rate to 0.007408182206817179.
8571/8571 [==============================] - 1385s 162ms/step - loss: 0.1404 - output_gender_loss: 0.0188 - output_age_band_loss: 0.1216 - output_gender_accuracy: 0.9932 - output_age_band_accuracy: 0.9568 - val_loss: 0.3266 - val_output_gender_loss: 0.0297 - val_output_age_band_loss: 0.2969 - val_output_gender_accuracy: 0.9890 - val_output_age_band_accuracy: 0.8906

Epoch 00004: val_output_age_band_accuracy improved from 0.84179 to 0.89063, saving model to CheckPoints_K-Face_Gender_Age_Band_F1_Score


C:\Users\Moon\anaconda3\envs\TF.2.5.0-GPU\lib\site-packages\tensorflow\python\keras\utils\generic_utils.py:494: CustomMaskWarning: Custom mask layers require a config and must override get_config. When loading, the custom mask layer must be passed to the custom_objects argument.
  warnings.warn('Custom mask layers require a config and must override '


INFO:tensorflow:Assets written to: CheckPoints_K-Face_Gender_Age_Band_F1_Score\assets
Epoch 5/10

Epoch 00005: LearningRateScheduler reducing learning rate to 0.006703200460356393.
8571/8571 [==============================] - 1373s 160ms/step - loss: 0.0986 - output_gender_loss: 0.0146 - output_age_band_loss: 0.0840 - output_gender_accuracy: 0.9946 - output_age_band_accuracy: 0.9700 - val_loss: 1.0131 - val_output_gender_loss: 0.0804 - val_output_age_band_loss: 0.9327 - val_output_gender_accuracy: 0.9738 - val_output_age_band_accuracy: 0.7865

Epoch 00005: val_output_age_band_accuracy did not improve from 0.89063
Epoch 6/10

Epoch 00006: LearningRateScheduler reducing learning rate to 0.006065306597126334.
8571/8571 [==============================] - 1371s 160ms/step - loss: 0.0751 - output_gender_loss: 0.0121 - output_age_band_loss: 0.0630 - output_gender_accuracy: 0.9954 - output_age_band_accuracy: 0.9778 - val_loss: 0.1992 - val_output_gender_loss: 0.0330 - val_output_age_band_loss: 0.1662 - val_output_gender_accuracy: 0.9879 - val_output_age_band_accuracy: 0.9432

Epoch 00006: val_output_age_band_accuracy improved from 0.89063 to 0.94324, saving model to CheckPoints_K-Face_Gender_Age_Band_F1_Score


C:\Users\Moon\anaconda3\envs\TF.2.5.0-GPU\lib\site-packages\tensorflow\python\keras\utils\generic_utils.py:494: CustomMaskWarning: Custom mask layers require a config and must override get_config. When loading, the custom mask layer must be passed to the custom_objects argument.
  warnings.warn('Custom mask layers require a config and must override '


INFO:tensorflow:Assets written to: CheckPoints_K-Face_Gender_Age_Band_F1_Score\assets
Epoch 7/10

Epoch 00007: LearningRateScheduler reducing learning rate to 0.005488116360940264.
8571/8571 [==============================] - 1369s 160ms/step - loss: 0.0591 - output_gender_loss: 0.0105 - output_age_band_loss: 0.0485 - output_gender_accuracy: 0.9959 - output_age_band_accuracy: 0.9828 - val_loss: 1.2796 - val_output_gender_loss: 0.0693 - val_output_age_band_loss: 1.2103 - val_output_gender_accuracy: 0.9817 - val_output_age_band_accuracy: 0.8210

Epoch 00007: val_output_age_band_accuracy did not improve from 0.94324
Epoch 8/10

Epoch 00008: LearningRateScheduler reducing learning rate to 0.004965853037914095.
8571/8571 [==============================] - 1372s 160ms/step - loss: 0.0468 - output_gender_loss: 0.0089 - output_age_band_loss: 0.0380 - output_gender_accuracy: 0.9964 - output_age_band_accuracy: 0.9865 - val_loss: 1.4768 - val_output_gender_loss: 0.2161 - val_output_age_band_loss: 1.2607 - val_output_gender_accuracy: 0.9596 - val_output_age_band_accuracy: 0.8651

Epoch 00008: val_output_age_band_accuracy did not improve from 0.94324
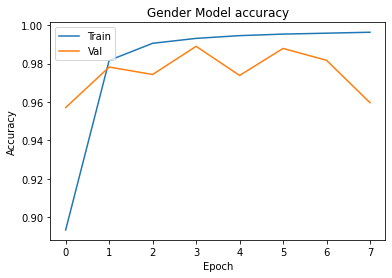
plt.plot(hist.history['output_gender_accuracy'])
plt.plot(hist.history['val_output_gender_accuracy'])
plt.title('Gender Model accuracy')
plt.xlabel('Epoch')
plt.ylabel('Accuracy')
plt.legend(['Train', 'Val'], loc='upper left')
plt.show()
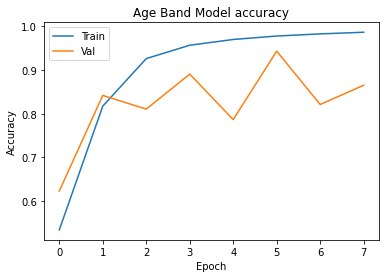
plt.plot(hist.history['output_age_band_accuracy'])
plt.plot(hist.history['val_output_age_band_accuracy'])
plt.title('Age Band Model accuracy')
plt.xlabel('Epoch')
plt.ylabel('Accuracy')
plt.legend(['Train', 'Val'], loc='upper left')
plt.show()
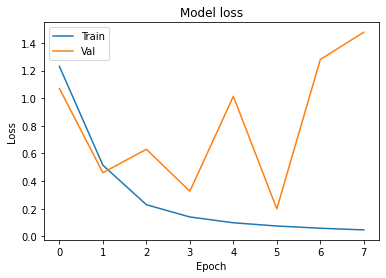
plt.plot(hist.history['loss'])
plt.plot(hist.history['val_loss'])
plt.title('Model loss')
plt.xlabel('Epoch')
plt.ylabel('Loss')
plt.legend(['Train', 'Val'], loc='upper left')
plt.show()
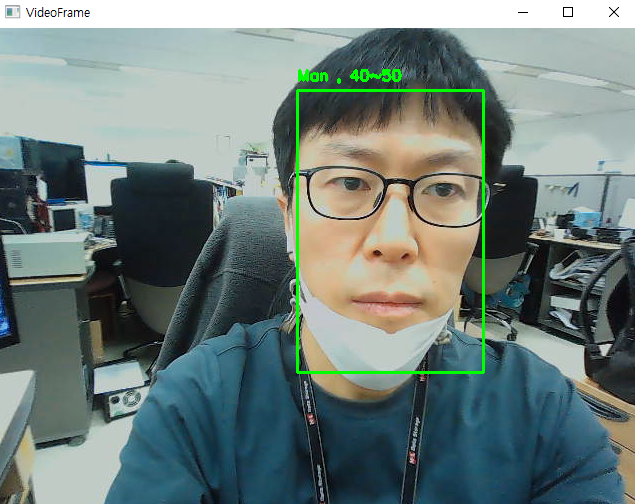
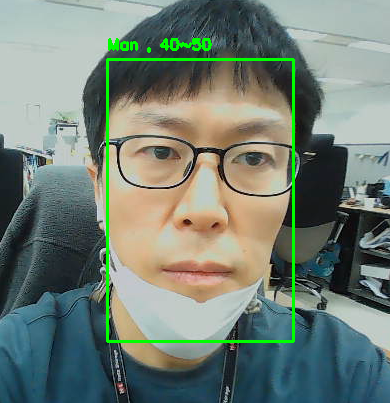
3. Inference
-
학습한 Model이 잘 작동하는지 확인해 보겠습니다.
-
Model에 Cam. Image를 Input할 때는 Train에 입력한 것과 동일한 Shape으로 Input해야 합니다.
-
그러므로, Preprocess때와 동일하게 Cam. Image에서 얼굴부분을 Detect해서 변환 후 Input으로 넣어야 합니다.
import cv2
import numpy as np
import tensorflow as tf
from keras.models import load_model, save_model
MODEL_FILE = "opencv_face_detector_uint8.pb"
CONFIG_FILE = "opencv_face_detector.pbtxt"
SIZE = 300
CONFIDENCE_FACE = 0.9
- 결과를 출력하기 위한 값입니다.
AGE_BAND_RESULT = ["20~30","30~40","40~50","Over 50"]
GENDER_RESULT = ["Man","Woman"]
- Preprocess에서 사용한 DNN Face Detector를 그대로 사용하도록 하겠습니다.
# Load Face Detection Model
net = cv2.dnn.readNetFromTensorflow( MODEL_FILE , CONFIG_FILE )
- Train을 마친 Model을 Load합니다.
print("Loading Model...")

model = load_model("CheckPoints_K-Face_Gender_Age_Band_F1_Score")
Loading Model...
- Cam을 연결해야 합니다.
cap = cv2.VideoCapture(0)
-
실시간으로 얼굴 부분을 Detect해서 분류합니다.
-
DNN Face Detector는 실시간으로 처리할 수 있을 만큼 빠릅니다.
-
Code 설명
if score > CONFIDENCE_FACE:
- Face Detector가 Detector한 결과가 일정 신뢰도 이상인 경우에만 처리합니다.
left = int(detection[3] * cols)
top = int(detection[4] * rows)
right = int(detection[5] * cols)
bottom = int(detection[6] * rows)cropped = frame[top:bottom, left:right]
cropped = cv2.cvtColor(cropped, cv2.COLOR_BGR2RGB)
cropped = cv2.resize( cropped , dsize=(224,224) )
cropped = np.array(cropped).reshape(-1,224,224,3)
- 얼굴 부분만 잘라내서 Model Input에 넣을 수 있도록 Reshape합니다.pred = model.predict( cropped )
gender_result = pred[0]
age_band_result = pred[1]- Model의 결과물에서 성별과 연령대를 구분해서 출력해 줍니다.
while cv2.waitKey(1) < 0:
    ret, frame = cap.read()
    rows, cols, channels = frame.shape

    blob = cv2.dnn.blobFromImage(frame, 1.0, (SIZE, SIZE))

    net.setInput(blob)
    detections = net.forward()

    for detection in detections[0, 0]:

        score = float(detection[2])

        if score > CONFIDENCE_FACE:

            if detection[3] >= 1.00 or detection[4] >= 1.00 or detection[5] >= 1.00 or detection[6] >= 1.00 or detection[3] <= 0 or detection[4] < 0 or detection[5] <= 0 or detection[6] <= 0:
                pass
            else:
                left = int(detection[3] * cols)
                top = int(detection[4] * rows)
                right = int(detection[5] * cols)
                bottom = int(detection[6] * rows)

                cropped = frame[top:bottom, left:right]
                cropped = cv2.cvtColor(cropped, cv2.COLOR_BGR2RGB)
                cropped = cv2.resize( cropped , dsize=(224,224) )
                cropped = np.array(cropped).reshape(-1,224,224,3)

                pred = model.predict( cropped )

                gender_result = pred[0]
                age_band_result = pred[1]

                AGE_BAND_RESULT = ["20~30","30~40","40~50","Over 50"]
                GENDER_RESULT = ["Man","Woman"]

                Result = "{0} , {1}".format(GENDER_RESULT[int(np.argmax(np.reshape( gender_result , (1,-1) )))] , AGE_BAND_RESULT[int(np.argmax(np.reshape( age_band_result , (1,-1) )))])

                cv2.putText(frame, Result, (left, top - 10), cv2.FONT_HERSHEY_SIMPLEX,0.5, (0, 255, 0), 2)
                cv2.rectangle(frame, (left, top), (right, bottom), (0, 255, 0), 2)


    cv2.imshow("VideoFrame", frame)

cap.release()
cv2.destroyAllWindows()