Image Captioning
개인적으로 대량의 사진에 Caption을 달아야 할 일이 생겨서 이것저것 알아보던 중에 찾은 예제입니다.
원본은 Image Captioning with Keras이며
제가 개인적인 Comment와 설명을 위한 그림을 추가하였습니다.
원 저자(Harshall Lamba)에게 허락을 구하고 올리는 것이니 태클 노노!
이 예제에서는 Flickr 8k Image Data Set을 사용할 예정인데, Flickr 8k Data Set에는 총 8091개의 Image File이 있고 각 Image File당 5개의 Caption이 제공됩니다.
‘Flickr8k.token.txt’에 각 Image의 Caption이 저장되어 있습니다.
우선 필요한 Package를 Load합니다.
주로 Keras를 사용할 예정이며, Image에서 Feature Extract를 위해 VGG16 Model을 사용할 예정입니다.
import numpy as np
from numpy import array
import pandas as pd
import matplotlib.pyplot as plt
%matplotlib inline
import string
import os
from PIL import Image
import glob
from pickle import dump, load
from time import time
from keras.preprocessing import sequence
from keras.models import Sequential
from keras.layers import LSTM, Embedding, TimeDistributed, Dense, RepeatVector,\
                         Activation, Flatten, Reshape, concatenate, Dropout, BatchNormalization
from keras.optimizers import Adam, RMSprop
from keras.layers.wrappers import Bidirectional
from keras.layers.merge import add
from keras.applications.inception_v3 import InceptionV3
from keras.preprocessing import image
from keras.models import Model
from keras import Input, layers
from keras import optimizers
from keras.applications.inception_v3 import preprocess_input
from keras.preprocessing.text import Tokenizer
from keras.preprocessing.sequence import pad_sequences
from keras.utils import to_categorical

from tqdm import tqdm_notebook
# load doc into memory
def load_doc(filename):
    # open the file as read only
    file = open(filename, 'r')
    # read all text
    text = file.read()
    # close the file
    file.close()
    return text

filename = "../Flickr8k_text/Flickr8k.token.txt"

# load descriptions
doc = load_doc(filename)

print(doc[:866])
1000268201_693b08cb0e.jpg#0	A child in a pink dress is climbing up a set of stairs in an entry way .
1000268201_693b08cb0e.jpg#1	A girl going into a wooden building .
1000268201_693b08cb0e.jpg#2	A little girl climbing into a wooden playhouse .
1000268201_693b08cb0e.jpg#3	A little girl climbing the stairs to her playhouse .
1000268201_693b08cb0e.jpg#4	A little girl in a pink dress going into a wooden cabin .
1001773457_577c3a7d70.jpg#0	A black dog and a spotted dog are fighting
1001773457_577c3a7d70.jpg#1	A black dog and a tri-colored dog playing with each other on the road .
1001773457_577c3a7d70.jpg#2	A black dog and a white dog with brown spots are staring at each other in the street .
1001773457_577c3a7d70.jpg#3	Two dogs of different breeds looking at each other on the road .
1001773457_577c3a7d70.jpg#4	Two dogs on pavement moving toward each other .
-
위와 같은 형태로 한 Line에 Image File Name과 Caption의 Index , Caption 문자열의 순서로 저장되어 있습니다.
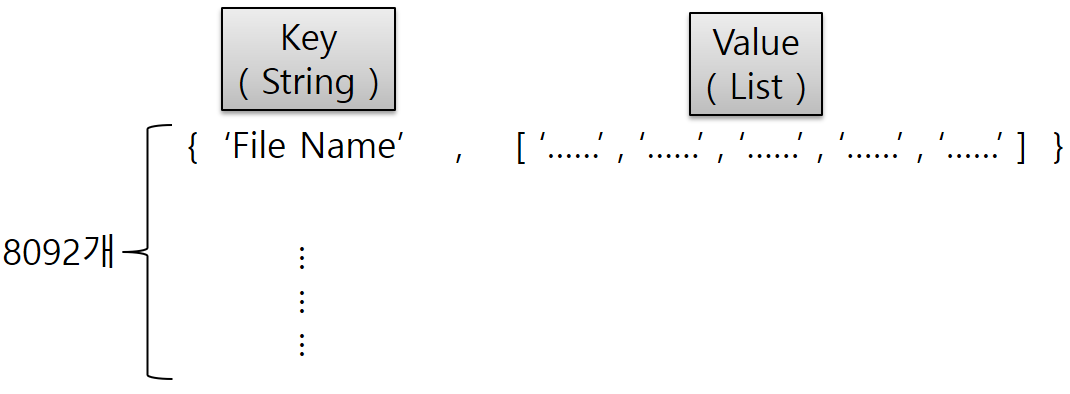
- 이렇게 그냥 두고 사용하기엔 불편하니, 이후에 사용하기 쉽도록 Dict. 형태로 바꾸어 보겠습니다.
- Dict.의 Key는 Image File Name , Value는 5개의 Caption이 담긴 List형태로 만들겠습니다.
def load_descriptions(doc):

    mapping = dict()

    # process lines
    for line in doc.split('\n'):

        # split line by white space
        tokens = line.split()

        if len(line) < 2:
            continue

        # take the first token as the image id, the rest as the description
        image_id, image_desc = tokens[0], tokens[1:]

        # extract filename from image id
        image_id = image_id.split('.')[0]

        # convert description tokens back to string
        image_desc = ' '.join(image_desc)

        # create the list if needed
        if image_id not in mapping:
            mapping[image_id] = list()

        # store description
        mapping[image_id].append(image_desc)

    return mapping

# parse descriptions
descriptions = load_descriptions(doc)
print('Loaded: %d ' % len(descriptions))

print( descriptions['1000268201_693b08cb0e'] )
Loaded: 8092
['A child in a pink dress is climbing up a set of stairs in an entry way .', 'A girl going into a wooden building .', 'A little girl climbing into a wooden playhouse .', 'A little girl climbing the stairs to her playhouse .', 'A little girl in a pink dress going into a wooden cabin .']
- 위와 같이 우리가 원하는대로 Dict. 형태의 자료구조가 만들어졌습니다.
- Image File 갯수는 8091개인데, Caption File에는 총 8092개가 있네요.
- Caption의 Text에 특별한 전처리를 하겠습니다.
- 추후에 처리를 편하게 하기 위해 모든 문자를 소문자로 변환
- 불필요한 문자를 삭제
- 부정관사 , ‘&’ , 숫자 삭제
def clean_descriptions(descriptions):

    # prepare translation table for removing punctuation
    table = str.maketrans('', '', string.punctuation)

    for key, desc_list in descriptions.items():
        for i in range(len(desc_list)):
            desc = desc_list[i]

            # tokenize
            desc = desc.split()

            # convert to lower case
            desc = [word.lower() for word in desc]

            # remove punctuation from each token
            desc = [w.translate(table) for w in desc]

            # remove hanging 's' and 'a'
            desc = [word for word in desc if len(word)>1]

            # remove tokens with numbers in them
            desc = [word for word in desc if word.isalpha()]

            # store as string
            desc_list[i] =  ' '.join(desc)
# clean descriptions
clean_descriptions(descriptions)
print( descriptions['1000268201_693b08cb0e'] )
['child in pink dress is climbing up set of stairs in an entry way', 'girl going into wooden building', 'little girl climbing into wooden playhouse', 'little girl climbing the stairs to her playhouse', 'little girl in pink dress going into wooden cabin'] <br/> <br/> <br/> <br/> <br/> <br/> <br/> <br/>
- 미리 만들어둔 Image File & Caption의 Dict.에서 Caption에서 사용된 단어들을 분리하여 Set로 만듭니다.
- Set은 중복을 허용하지 않는 Python의 자료구조입니다.
- set.update()는 복수개의 값을 Set에 추가하고자 할 때 사용하는 함수입니다.
# convert the loaded descriptions into a vocabulary of words
def to_vocabulary(descriptions):

    # build a list of all description strings
    all_desc = set()

    for key in descriptions.keys():
        # key(Image File Name)당 5개의 Caption이 있으므로
        # 각각의 Caption에서 공백을 기준으로 Split하여
        # set에 추가합니다.
        [all_desc.update(d.split()) for d in descriptions[key]]

    return all_desc
# summarize vocabulary
vocabulary = to_vocabulary(descriptions)
print('Original Vocabulary Size: %d' % len(vocabulary))
Original Vocabulary Size: 8763
- 깔끔하게 정리된 Caption을 저장해 둡니다.
# save descriptions to file, one per line
def save_descriptions(descriptions, filename):
    lines = list()
    for key, desc_list in descriptions.items():
        for desc in desc_list:
            lines.append(key + ' ' + desc)
    data = '\n'.join(lines)
    file = open(filename, 'w')
    file.write(data)
    file.close()
save_descriptions(descriptions, 'descriptions.txt')
- Flicker 8K Data Set에는 친절하게도 Train에 사용할 6000개의 Image File Name List를 제공해 줍니다.
- Flickr_8k.trainImages.txt을 열어서 File Name을 Set에 담아둡시다.
# load a pre-defined list of photo identifiers
def load_set(filename):
    doc = load_doc(filename)
    dataset = list()

    # process line by line
    for line in doc.split('\n'):

        # skip empty lines
        if len(line) < 1:
            continue

        # get the image identifier
        identifier = line.split('.')[0]
        dataset.append(identifier)

    return set(dataset)
# load training dataset (6K)
filename = '../Flickr8k_text/Flickr_8k.trainImages.txt'
train = load_set(filename)
print('Dataset: %d' % len(train))
Dataset: 6000
- Flicker 8K Dataset의 전체 File Name List를 뽑아놓습니다.
# Below path contains all the images
images = '../Flickr8k_Dataset/'

# Create a list of all image names in the directory
img = glob.glob(images + '*.jpg')
print( len( img ) )
img[:10]
8091
['../Flickr8k_Dataset\\1000268201_693b08cb0e.jpg',
 '../Flickr8k_Dataset\\1001773457_577c3a7d70.jpg',
 '../Flickr8k_Dataset\\1002674143_1b742ab4b8.jpg',
 '../Flickr8k_Dataset\\1003163366_44323f5815.jpg',
 '../Flickr8k_Dataset\\1007129816_e794419615.jpg',
 '../Flickr8k_Dataset\\1007320043_627395c3d8.jpg',
 '../Flickr8k_Dataset\\1009434119_febe49276a.jpg',
 '../Flickr8k_Dataset\\1012212859_01547e3f17.jpg',
 '../Flickr8k_Dataset\\1015118661_980735411b.jpg',
 '../Flickr8k_Dataset\\1015584366_dfcec3c85a.jpg']
- 전체 8091개 중에 Train Image의 Full Path를 뽑습니다.
# Below file conatains the names of images to be used in train data
train_images_file = '../Flickr8k_text/Flickr_8k.trainImages.txt'

# Read the train image names in a set
train_images = set(open(train_images_file, 'r').read().strip().split('\n'))

# Create a list of all the training images with their full path names
train_img = []

for i in img: # img is list of full path names of all images
    if i[len(images):] in train_images: # Check if the image belongs to training set
        train_img.append(i) # Add it to the list of train images
print( len(train_img) )
train_img[:10]
6000
['../Flickr8k_Dataset\\1000268201_693b08cb0e.jpg',
 '../Flickr8k_Dataset\\1001773457_577c3a7d70.jpg',
 '../Flickr8k_Dataset\\1002674143_1b742ab4b8.jpg',
 '../Flickr8k_Dataset\\1003163366_44323f5815.jpg',
 '../Flickr8k_Dataset\\1007129816_e794419615.jpg',
 '../Flickr8k_Dataset\\1007320043_627395c3d8.jpg',
 '../Flickr8k_Dataset\\1009434119_febe49276a.jpg',
 '../Flickr8k_Dataset\\1012212859_01547e3f17.jpg',
 '../Flickr8k_Dataset\\1015118661_980735411b.jpg',
 '../Flickr8k_Dataset\\1015584366_dfcec3c85a.jpg']
- Test에 사용할 Image File도 Flickr_8k.testImages.txt 내용을 참고해 Full Path List를 작성해 둡시다.
# Below file conatains the names of images to be used in test data
test_images_file = '../Flickr8k_text/Flickr_8k.testImages.txt'
# Read the validation image names in a set# Read the test image names in a set
test_images = set(open(test_images_file, 'r').read().strip().split('\n'))

# Create a list of all the test images with their full path names
test_img = []

for i in img: # img is list of full path names of all images
    if i[len(images):] in test_images: # Check if the image belongs to test set
        test_img.append(i) # Add it to the list of test images
print( len(test_img) )
test_img[:10]
1000
['../Flickr8k_Dataset\\1056338697_4f7d7ce270.jpg',
 '../Flickr8k_Dataset\\106490881_5a2dd9b7bd.jpg',
 '../Flickr8k_Dataset\\1082379191_ec1e53f996.jpg',
 '../Flickr8k_Dataset\\1084040636_97d9633581.jpg',
 '../Flickr8k_Dataset\\1096395242_fc69f0ae5a.jpg',
 '../Flickr8k_Dataset\\1107246521_d16a476380.jpg',
 '../Flickr8k_Dataset\\1119015538_e8e796281e.jpg',
 '../Flickr8k_Dataset\\1122944218_8eb3607403.jpg',
 '../Flickr8k_Dataset\\1131800850_89c7ffd477.jpg',
 '../Flickr8k_Dataset\\1131932671_c8d17751b3.jpg']
- 나중에 Train할 때 사용하기 위해서, Train Image(6000개)의 Caption을 따로 뽑아서 저장합니다.
# load clean descriptions into memory
def load_clean_descriptions(filename, dataset):
    # load document
    doc = load_doc(filename)

    descriptions = dict()

    for line in doc.split('\n'):

        # split line by white space
        tokens = line.split()

        # split id from description
        image_id, image_desc = tokens[0], tokens[1:]

        # skip images not in the set
        if image_id in dataset:
            # create list
            if image_id not in descriptions:
                descriptions[image_id] = list()

            # wrap description in tokens
            desc = 'startseq ' + ' '.join(image_desc) + ' endseq'

            # store
            descriptions[image_id].append(desc)

    return descriptions
# descriptions
train_descriptions = load_clean_descriptions('descriptions.txt', train)
print('Descriptions: train=%d' % len(train_descriptions))
Descriptions: train=6000
train_descriptions['1000268201_693b08cb0e']
['startseq child in pink dress is climbing up set of stairs in an entry way endseq',
 'startseq girl going into wooden building endseq',
 'startseq little girl climbing into wooden playhouse endseq',
 'startseq little girl climbing the stairs to her playhouse endseq',
 'startseq little girl in pink dress going into wooden cabin endseq']
- Keras에서 제공해주는 수많은 Pre-Trained Model 중에서 우리는 Inception V3 Model을 사용하도록 하겠습니다.
- 아래 Code를 실행하면 최초 한번 학습된 Model의 Weight값을 받아옵니다.
- 아래 Link에서 좀 더 자세한 내용을 확인 가능
# Load the inception v3 model
model = InceptionV3(weights='imagenet')
- 이제 기존에 학습된 Inception V3 Model을 우리가 쓸 수 있도록 약간 수정하도록 하겠습니다.
- Inception V3 Model의 마지막 Dense Layer(Classifier , Softmax Layer)만 빼버리고 사용하도록 하겠습니다.
- Inception V3 Model은 ImageNet의 Dataset을 Training Set으로 학습된 Model이기 때문입니다.
- 마지막 Dense Layer만 뺀 Model은 Image의 Feature들을 Extract하는 기능만 가지고 있습니다.
- 우리는 Extract된 Feature들만 이용하여 Image Caption을 학습하는데 사용하도록 하겠습니다.

- Keras의 함수형 API를 사용하여 새로운 Model을 만듭니다.
# Create a new model, by removing the last layer (output layer) from the inception v3
model_new = Model(model.input, model.layers[-2].output)
- 기존 Model은 총 313개의 Layer가 있고, 마지막 Layer는 Softmax Layer이며, Classifier의 기능을 합니다.
print( type(model.layers) )
print( len(model.layers) )
print( model.layers[0] )
print( model.layers[1] )

print( model.layers[-2] )
print( model.layers[-1] )
<class 'list'>
313
<keras.engine.input_layer.InputLayer object at 0x00000237899DE788>
<keras.layers.convolutional.Conv2D object at 0x00000237899DE148>
<keras.layers.pooling.GlobalAveragePooling2D object at 0x000002380F475408>
<keras.layers.core.Dense object at 0x000002380F48DD08>
- 수정된 Model은 Layer수가 한개 줄었으며, 마지막층은 Fully Connected Layer이며, Feature Extractor 역할을 합니다.
print( len(model_new.layers) )
print( model_new.layers[0] )
print( model_new.layers[1] )

print( model_new.layers[-2] )
print( model_new.layers[-1] )
312
<keras.engine.input_layer.InputLayer object at 0x00000237899DE788>
<keras.layers.convolutional.Conv2D object at 0x00000237899DE148>
<keras.layers.merge.Concatenate object at 0x000002380F468B08>
<keras.layers.pooling.GlobalAveragePooling2D object at 0x000002380F475408>
- Training Set의 6000개의 Image File에 대해서 Inception V3 Model을 이용해 Feature를 추출해 냅니다.
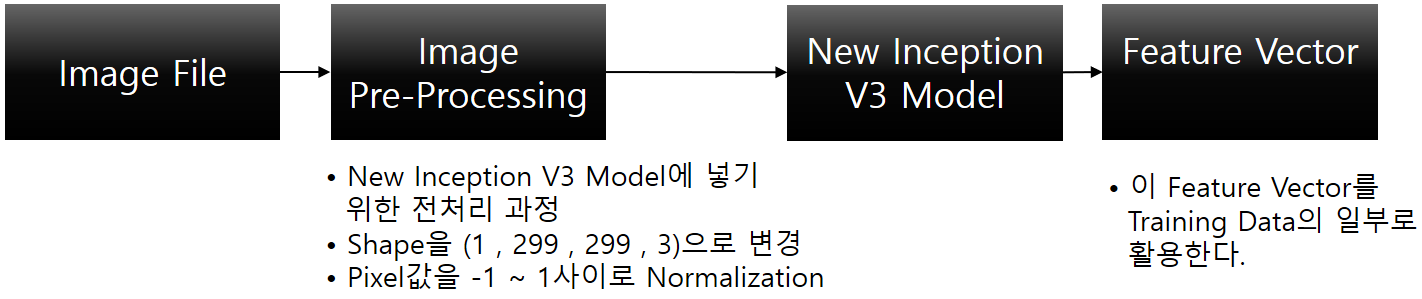
def preprocess(image_path):

    # Convert all the images to size 299x299 as expected by the inception v3 model
    # load_img(path, grayscale = FALSE, target_size = NULL)
    img = image.load_img(image_path, target_size=(299, 299))

    # Convert PIL image to numpy array of 3-dimensions
    # img_to_array(img, data_format = NULL)
    x = image.img_to_array(img) # (299, 299, 3)

    # Add one more dimension
    x = np.expand_dims(x, axis=0)    # (1, 299, 299, 3)

    # preprocess the images using preprocess_input() from inception module
    # preprocess_input()은 미리 학습된 Inception V3 Model에 맞게 Image Data를 변환시켜 줍니다.
    # 실제 여기서 하는 일은 -1 ~ 1 사이의 값으로 변환시켜 줍니다.
    x = preprocess_input(x)   # (1, 299, 299, 3)

    return x
# Function to encode a given image into a vector of size (2048, )
def encode(img):
    img = preprocess(img) # preprocess the image

    fea_vec = model_new.predict( img ) # Get the encoding vector for the image
    fea_vec = np.reshape(fea_vec, fea_vec.shape[1]) # reshape from (1, 2048) to (2048, )

    return fea_vec
- img(train_img)는 Train에 사용할 Image들의 Full Path를 담고 있습니다.
- img[len(images):]는 Full Path의 앞쪽 부분을 잘라내고, File Name만으로 Dict.의 Key로 사용하겠다는 의미입니다.
- encoding_train Dict.()는 각 Train Image들을 앞에서 선언한 Inception V3의 마지막 Classifier부분을 제외한 Model에 넣어
Feature만 모아 놓은 것입니다.
import pickle

if os.path.isfile("encoded_train_images.pkl"):
    train_features = load(open("encoded_train_images.pkl", "rb"))
    print('Photos: train=%d' % len(train_features))

else:
    # Call the funtion to encode all the train images
    # This will take a while on CPU - Execute this only once
    start = time()
    encoding_train = {}

    for img in tqdm_notebook( train_img ):
        # images : '../Flicker8k_Dataset/'
        # img[len(images):] : Training Image에서 Full Path 앞부분을 잘라낸, Image File Name
        encoding_train[img[len(images):]] = encode(img)

    print("Time taken in seconds =", time()-start)

    # * Training Image들의 Feature Vector를 File로 저장해 놓읍시다.
    with open("encoded_train_images.pkl", "wb") as encoded_pickle:
        pickle.dump(encoding_train, encoded_pickle)
Photos: train=6000
- Test에 사용할 Image들도 마찬가지로 Feature Vector를 만들어 놓읍시다.
if os.path.isfile("encoded_test_images.pkl"):
    with open("encoded_test_images.pkl", "rb") as encoded_pickle:
        encoding_test = load(encoded_pickle)

else:
    # Call the funtion to encode all the test images - Execute this only once
    start = time()
    encoding_test = {}

    for img in tqdm_notebook( test_img ):
        encoding_test[img[len(images):]] = encode(img)

    print("Time taken in seconds =", time()-start)

    # Save the bottleneck test features to disk
    with open("encoded_test_images.pkl", "wb") as encoded_pickle:
        pickle.dump(encoding_test, encoded_pickle)
이제 Train Set의 Caption에서 사용된 개별 단어들의 목록을 만들어 보겠습니다.
-
단어들을 수치화하고 Indexing을 하는 이유는 최종적으로 Supervised Learning을 하기 위해서는
어떤 형태의 Data이든지 이를 수치화하여 하기 때문입니다. - Train Data의 모든 Caption을 하나의 List로 만듭니다.
- 6000개 x 각각 5개의 Caption = 30000
# Create a list of all the training captions
all_train_captions = []

for key, val in train_descriptions.items():
    for cap in val:
        all_train_captions.append(cap)

len(all_train_captions)
30000
all_train_captions[:10]
['startseq child in pink dress is climbing up set of stairs in an entry way endseq',
 'startseq girl going into wooden building endseq',
 'startseq little girl climbing into wooden playhouse endseq',
 'startseq little girl climbing the stairs to her playhouse endseq',
 'startseq little girl in pink dress going into wooden cabin endseq',
 'startseq black dog and spotted dog are fighting endseq',
 'startseq black dog and tricolored dog playing with each other on the road endseq',
 'startseq black dog and white dog with brown spots are staring at each other in the street endseq',
 'startseq two dogs of different breeds looking at each other on the road endseq',
 'startseq two dogs on pavement moving toward each other endseq']
- 다음과 같이 Caption들의 전체 단어의 출현 빈도를 Count해서 List에 채웁니다.
- 10번 이하로 나온 단어는 버립니다.
# Consider only words which occur at least 10 times in the corpus
word_count_threshold = 10
word_counts = {}
nsents = 0

for sent in all_train_captions:
    nsents += 1

    for w in sent.split(' '):
        word_counts[w] = word_counts.get(w, 0) + 1

vocab = [w for w in word_counts if word_counts[w] >= word_count_threshold]
print('preprocessed words %d -> %d' % (len(word_counts), len(vocab)))
preprocessed words 7578 -> 1651
vocab[:20]
['startseq',
 'child',
 'in',
 'pink',
 'dress',
 'is',
 'climbing',
 'up',
 'set',
 'of',
 'stairs',
 'an',
 'way',
 'endseq',
 'girl',
 'going',
 'into',
 'wooden',
 'building',
 'little']
- 이 단어들의 List를 좀 더 편하게 사용하기 위해서 단어와 그 단어에 해당하는 Index를 개별적으로 담고 있는 각각의 Dict.를 정의합니다.
ixtoword = {}
wordtoix = {}

ix = 1
for w in vocab:
    wordtoix[w] = ix
    ixtoword[ix] = w
    ix += 1
wordtoix['in']
3
ixtoword[3]
'in'
vocab_size = len(ixtoword) + 1 # one for appended 0's
vocab_size
1652
- Caption 중에 가장 긴 단어를 가진 Caption의 단어 갯수는 34개네요
- 이 값은 이후 LSTM에 들어갈 Word Data 전체 길이를 결정할 때 사용됩니다.
# convert a dictionary of clean descriptions to a list of descriptions
def to_lines(descriptions):
    all_desc = list()
    for key in descriptions.keys():
        [all_desc.append(d) for d in descriptions[key]]
    return all_desc

# calculate the length of the description with the most words
def max_length(descriptions):
    lines = to_lines(descriptions)
    return max(len(d.split()) for d in lines)
# determine the maximum sequence length
max_length = max_length(train_descriptions)

print('Description Length: %d' % max_length)
Description Length: 34
Feature Engineering ( Data Generator )
- ML or DL의 Training에 사용할 Data는 Integer or Float 형태의 Numberical Value이어야 합니다..
-
Training Image Set과 Caption을 어떤 방식으로 RNN에 넣을 수 있는 Numberical Value로 변환하는지 알아보겠습니다.
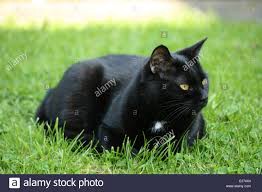
- 다음과 같은 그림이 있다고 가정해보자. 이 Image과 이 Image의 Caption( the black cat sat on grass )을 RNN에 넣을 수 있는 형태로 바꿔보겠습니다.
- 우선 Image에 대한 Data와 Caption에 대한 정보를 분리해서 생각해봅시다.
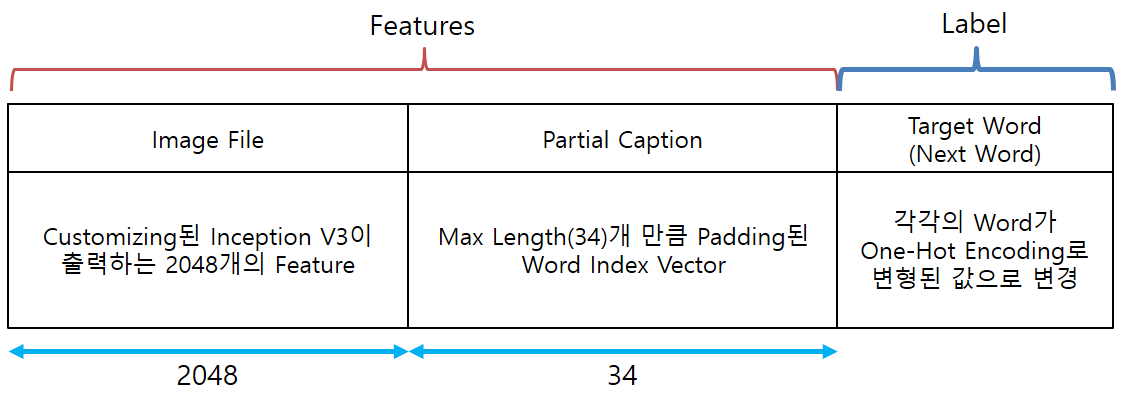
- Image에 대한 Feature는 앞서 Pre-Trained Model인 Inception V3 Model에서 Classifier를 제거한 Model을 이용해 Feature를 뽑을 수 있습니다.
-
New Inception V3 Model은 Image에 대해서 2048개의 Feature를 뽑아 줄 것입니다.
- 우리가 Predict하려고 하는 값은, 임의의 Image에 대한 Caption입니다.
-
그래서, Training시에 Label은 Caption이 될 것입니다.
- 그러나, 한 번의 Predict로 전체 Caption을 전부 알아내는 것이 아니라, Caption의 일부로 다음 Caption의 단어를 유추하는 방식을 사용할 것입니다.
-
이와 같이 Sequence 형태의 Data를 다루기 위해서 우리는 RNN(Recurrent Neural Network)을 사용할 것이고,
이에 따라 RNN Input에 적절한 형태의 Training Data 형태를 만들어야 합니다. - 즉, 아래와 같은 형태의 Training Data Feature Format을 사용할 것입니다.
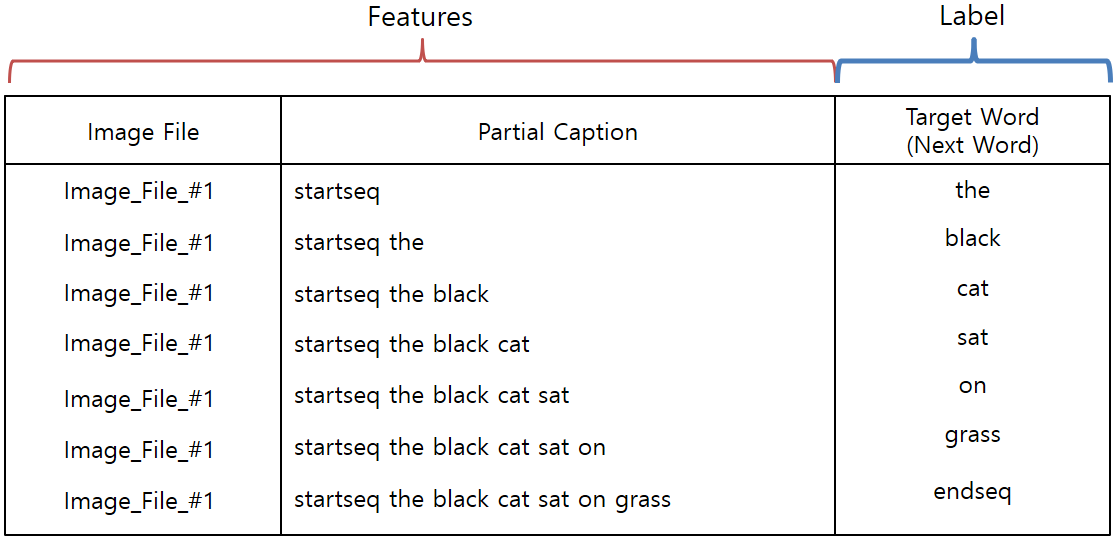
- RNN에 입력될 Caption의 Word를 Numberical Value로 변환하기 위해서 앞에서 작성한 wordtoix를 이용하여
아래와 같이 Word를 Index로 변환해 주어야 합니다.

- 각 Target Word는 One-Hot Encoding으로 변경된 값을 적용합니다.
- One-Hot Encoding 변경을 위해서, Keras에서 제공해 주는 to_categorical()을 사용합시다.
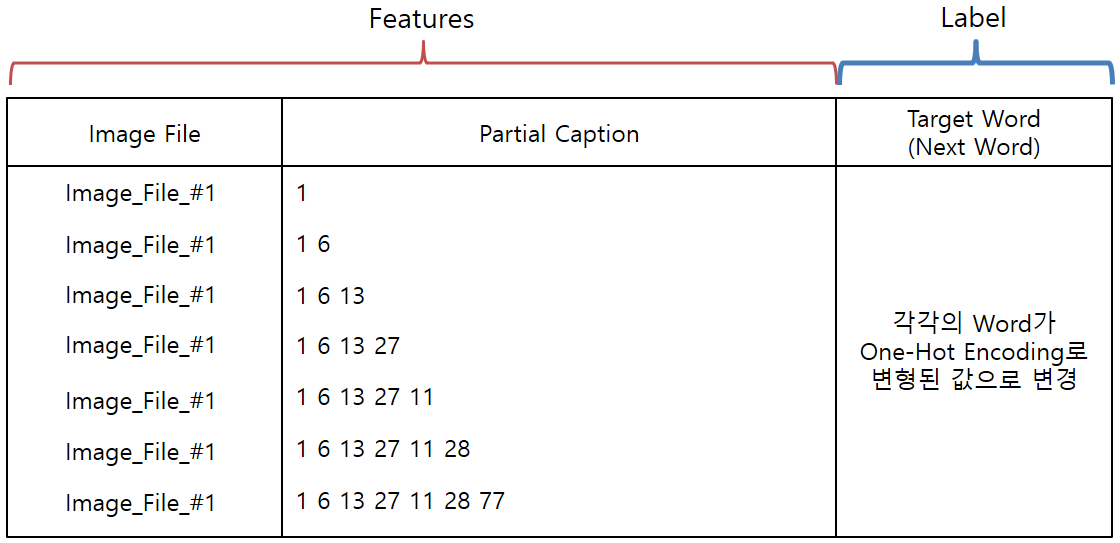
- Deep Learning의 Batch Process를 위해서는 각 Data의 Length가 모두 같은 길이어야 하기 때문에
Partial Caption의 길이도 모두 같은 길이로 변환해 주어야 합니다. - Partial Caption의 길이는 앞에서 구해놓은 값(Max Length : 34)으로 모두 통일해 주어야 합니다.
- 이를 위해서 Keras에서 제공해주는 pad_sequences()를 이용합시다.
- 마지막으로 Partial Caption은 Pre-Trained Word Embedding Model인 GLOVE라는 Model을 이용하여
한 번 더 변환한 Vector를 입력으로 사용하도록 하겠습니다. - GLOVE Model은 하나의 단어를 길이가 200인 Vector로 변환합니다.
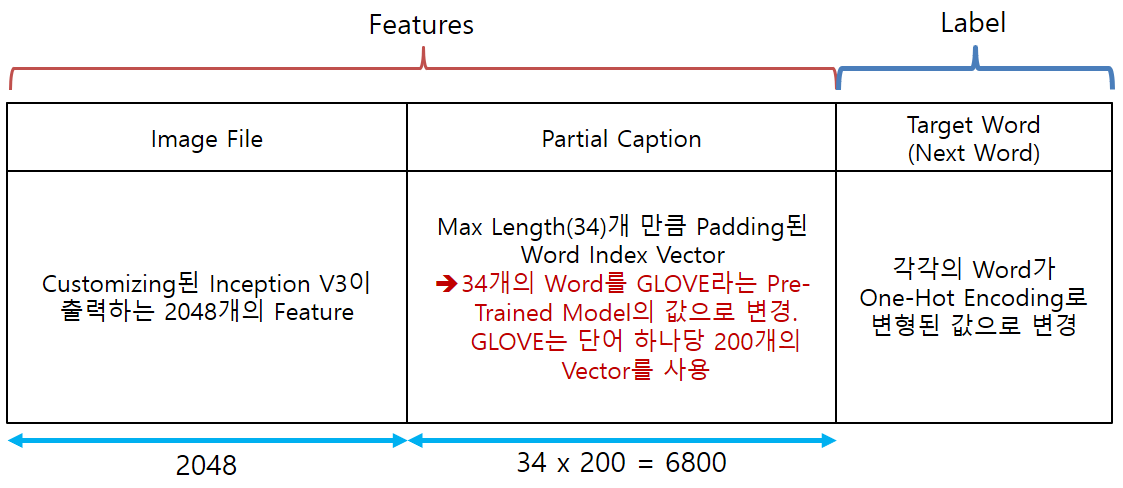
- 최종적으로 위와 같은 형태와 크기의 Data가 준비되어야 합니다.
-
간단하게 크기를 살펴보면 Image File 하나당 5개의 Caption이 있고,
Caption 하나당 평균적으로 7개의 단어로 구성되어 있다고 한다면 Training Data Set의 전체 Feature의 수는
( 2048 + (34 x 200) ) x 6000 x 5 x 7 = 1858080000개의 Feature
- 한 개의 Feature가 2byte라고 해도 대충 3.6GB가 필요합니다.
- 이런 이유로 Deep Learning 학습시에 Generator가 많이 쓰입니다.
Generator
-
Generator
A function which returns an iterator. It looks like a normal function except that it contains yield statements
for producing a series of values usable in a for-loop or that can be retrieved one at a time with the next() function.Each yield temporarily suspends processing, remembering the location execution state
(including local variables and pending try-statements). When the generator resumes,
it picks-up where it left-off (in contrast to functions which start fresh on every invocation). - Generator는 Python에서 제공해 주는 기능중의 하나.
- 일반적인 Function과 형태는 동일하나, Iterator를 Return해 준다는 것이 차이점
- Generator Function은 return대신에 yield 문을 사용합니다.
- 일반적인 함수는 사용이 종료되면 결과값을 호출부로 반환 후 함수 자체를 종료시킨 후 메모리 상에서 클리어 됩니다.
-
generator 함수가 실행 중 yield 를 만날 경우, 해당 함수는 그 상태로 정지 되며, 반환 값을 next()를
호출한 쪽으로 전달 하게 된다. 이후 해당 함수는 일반적인 경우 처럼 종료되는 것이 아니라 그 상태로
유지되게 된다. 즉, 함수에서 사용된 local 변수나 instruction pointer 등과 같은 함수 내부에서 사용된
데이터들이 메모리에 그대로 유지되는 것입니다. -
위와 같은 Generator의 특징을 이용하여, Deep Learning의 Train시에 대용량의 Train Data를 특정 크기의 단위로
잘라서 학습에 사용(Batch Process)하기 위해서 Generator를 사용하곤 합니다. - 아래의 Function은 지금까지 설명한 여러 Feature Engineering 기법들이 적용된 Generator Function 입니다.
# data generator, intended to be used in a call to model.fit_generator()
def data_generator(descriptions, photos, wordtoix, max_length, num_photos_per_batch):
    X1, X2, y = list(), list(), list()
    n = 0

    # loop for ever over images
    while 1:
        for key, desc_list in descriptions.items():
            n+=1
            # retrieve the photo feature
            photo = photos[key+'.jpg']
            for desc in desc_list:
                # encode the sequence
                seq = [wordtoix[word] for word in desc.split(' ') if word in wordtoix]

                # split one sequence into multiple X, y pairs
                for i in range(1, len(seq)):
                    # split into input and output pair
                    in_seq, out_seq = seq[:i], seq[i]

                    # pad input sequence
                    in_seq = pad_sequences([in_seq], maxlen=max_length)[0]

                    # encode output sequence
                    out_seq = to_categorical([out_seq], num_classes=vocab_size)[0]

                    # store
                    X1.append(photo)
                    X2.append(in_seq)
                    y.append(out_seq)

            # yield the batch data
            if n == num_photos_per_batch:
                yield [[array(X1), array(X2)], array(y)]
                X1, X2, y = list(), list(), list()
                n=0
GLOVE Model
# Load Glove vectors
#glove_dir = '../../storage/glove'
glove_dir = ''

embeddings_index = {} # empty dictionary
f = open(os.path.join(glove_dir, 'glove.6B.200d.txt'), encoding="utf-8")

for line in f:
    values = line.split()
    word = values[0]
    coefs = np.asarray(values[1:], dtype='float32')
    embeddings_index[word] = coefs
f.close()
print('Found %s word vectors.' % len(embeddings_index))
Found 400000 word vectors.
- 총 40만개의 단어가 있고, 각 단어는 길이가 200인 Float Vector로 구성되어 있습니다.
len( embeddings_index.keys() )
400000
print( len( embeddings_index['there'] ) )
print( embeddings_index['there'] )
200
[ 0.66193    0.16192   -0.090129  -0.59287    0.15391    0.45964
 -0.92443    0.081231   0.30275    0.45481    0.43279    0.54403
  0.087172   0.023256   0.23039    0.47905   -0.096603   0.58484
  0.15579    0.10372    0.40035    2.9028     0.10439   -0.2711
  0.16901   -0.43907   -0.14797   -0.33058    0.075262  -0.12359
 -0.1335    -0.47064   -0.20803    0.056494   0.023153  -0.59647
 -0.60186   -0.16583   -0.035943   0.38835    0.26658   -0.18612
 -0.14767    0.28221   -0.12491    0.40833    0.59739   -0.10637
  0.37463   -0.12592   -0.1511    -0.24287   -0.10597    1.0858
  0.32687   -0.23127    0.15763   -0.33119   -0.17161   -0.010115
  0.019711   0.23377   -0.070937   0.11325    0.5959    -0.38274
 -0.36533    0.31587    0.16818    0.12979    0.34776   -0.50396
 -0.36471   -0.052695   0.088028  -0.07151    0.17023   -0.11045
 -0.12536   -0.11016    0.19764   -0.10016   -0.44589    0.60566
 -0.10537   -0.22845   -0.28588   -0.35332    0.5583    -0.97876
  0.6335    -0.18142    0.77114   -0.33749   -0.049697   0.21859
  0.37727   -0.28821   -0.4062    -0.41819    0.51691    0.22893
  0.24848    0.31547    0.24026    0.14239    0.087551   1.0828
 -0.22786    0.15092   -0.022776  -0.33925    0.25267   -0.045602
  0.13915   -0.16625   -0.1174    -0.42071   -0.083483  -0.36796
  0.32522    0.55571    0.55867   -0.040181  -0.1844    -0.76857
  0.062204   0.0057532  0.30964   -0.52323    0.068855   0.11705
  0.12595    0.033983   0.0084073  0.29818   -0.037339  -0.13455
 -0.10109    0.20751   -0.034931   0.24178    0.14436   -0.19081
  1.5462     0.39855    0.25275   -0.28803    0.03398   -0.10733
  0.12775    0.58408   -0.22431   -0.13953    0.44922   -0.4701
 -0.25554   -0.080844  -0.015759  -0.25237   -0.28529   -0.33416
  0.18502   -0.27979   -0.3849     0.30444   -0.34264    0.33734
 -0.85254    0.59171   -0.40041    0.18137    0.14017    0.20243
 -0.17677   -0.50882   -0.1046     0.016365   0.054061  -0.04178
  1.2751    -0.13707   -0.32639    0.093104  -0.26178    0.031061
 -0.017219   0.47738   -0.24044   -0.020076   0.06639    0.22603
  0.083176  -0.18073   -0.047092  -0.25166   -0.011413  -0.18163
 -0.35468   -0.077695 ]
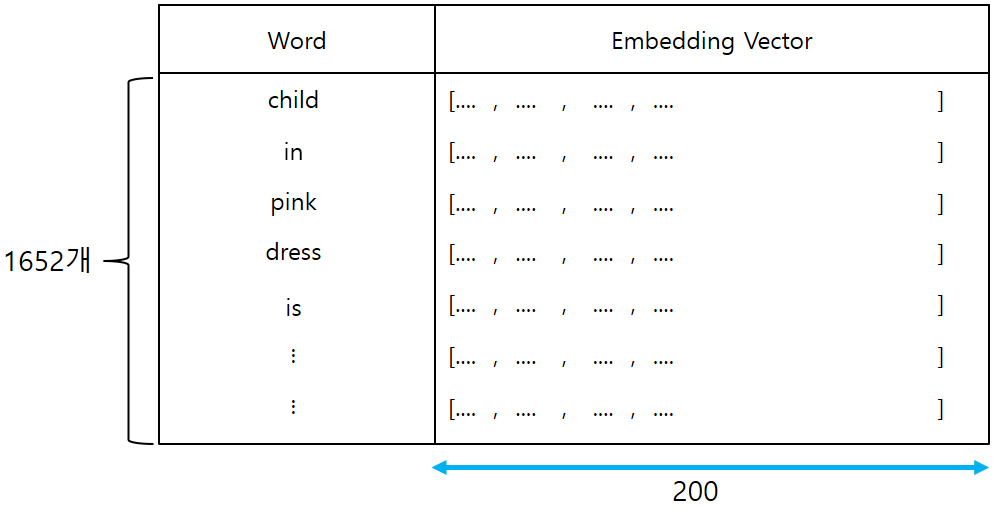
- GLOVE Model에서 우리가 Train Data에서 뽑아낸 Word들만 따로 Vector를 구성합니다.
- 이전에 조사한 Word의 갯수는 1652개이고, 각 Word는 200 Length의 Vector를 가지고 있으므로
최종적으로 1652 x 200 크기의 행렬이 만들어질 것입니다.
- For more information about Word Embedding
embedding_dim = 200

# Get 200-dim dense vector for each of the 10000 words in out vocabulary
embedding_matrix = np.zeros((vocab_size, embedding_dim))

for word, i in wordtoix.items():

    embedding_vector = embeddings_index.get(word)

    if embedding_vector is not None:
        # Words not found in the embedding index will be all zeros
        embedding_matrix[i] = embedding_vector
embedding_matrix.shape
(1652, 200)
Building Model
- 우리가 입력으로 사용할 값들은 크게 2가지로써, 하나는 Inception V3에서 받을 2048개의 Feature들과 나머지 하나는 Caption 값이 됩니다.
- Keras에서 제공하는 Sequential Model은 이런 형태의 입력을 받을 수 없습니다.
- 다양한 입력을 받을 수 있는 복잡한 Model 구성을 위해서 Keras에서 제공하는 Funtional API 기능을 사용해서 Model을 구성하도록 하겠습니다.
- Inception V3 Model의 출력을 입력으로 받는 Input Tensor입니다.
inputs1 = Input(shape=(2048,))
fe1 = Dropout(0.5)(inputs1)
fe2 = Dense(256, activation='relu')(fe1)
- Caption 정보를 입력으로 받을 Input Tensor입니다.
- LSTM에 관해서 조만간 다른 Posting으로 다루도록 하겠습니다.
inputs2 = Input(shape=(max_length,))
se1 = Embedding(vocab_size, embedding_dim, mask_zero=True)(inputs2)
se2 = Dropout(0.5)(se1)
se3 = LSTM(256)(se2)

decoder1 = add([fe2, se3])
decoder2 = Dense(256, activation='relu')(decoder1)

outputs = Dense(vocab_size, activation='softmax')(decoder2)

model = Model(inputs=[inputs1, inputs2], outputs=outputs)
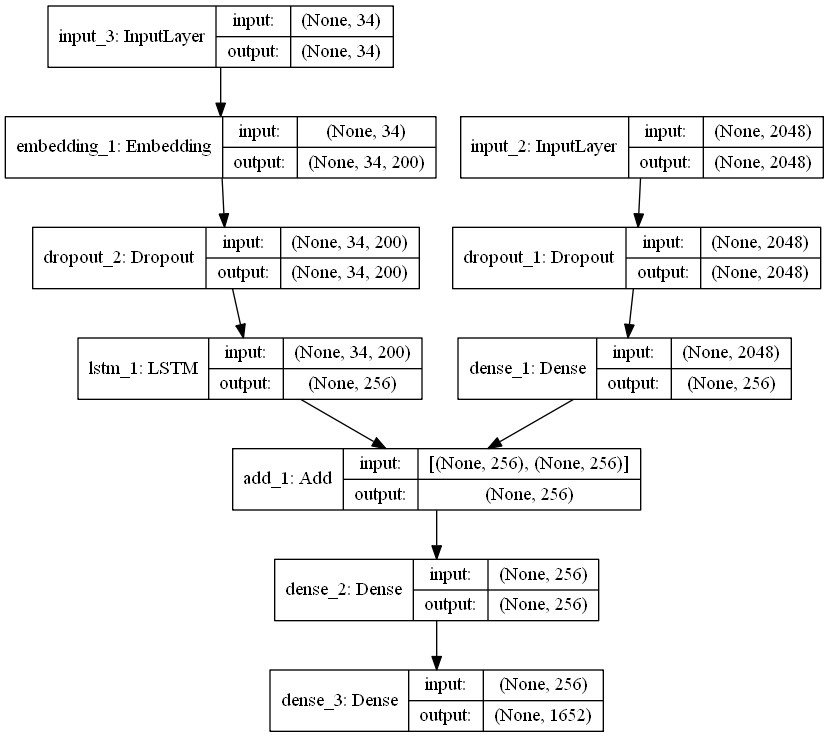
- 최종적으로 사용될 Model은 아래와 같은 Architecture를 갖습니다.
model.summary()
__________________________________________________________________________________________________
Layer (type)                    Output Shape         Param #     Connected to
==================================================================================================
input_3 (InputLayer)            (None, 34)           0
__________________________________________________________________________________________________
input_2 (InputLayer)            (None, 2048)         0
__________________________________________________________________________________________________
embedding_1 (Embedding)         (None, 34, 200)      330400      input_3[0][0]
__________________________________________________________________________________________________
dropout_1 (Dropout)             (None, 2048)         0           input_2[0][0]
__________________________________________________________________________________________________
dropout_2 (Dropout)             (None, 34, 200)      0           embedding_1[0][0]
__________________________________________________________________________________________________
dense_1 (Dense)                 (None, 256)          524544      dropout_1[0][0]
__________________________________________________________________________________________________
lstm_1 (LSTM)                   (None, 256)          467968      dropout_2[0][0]
__________________________________________________________________________________________________
add_1 (Add)                     (None, 256)          0           dense_1[0][0]
                                                                 lstm_1[0][0]
__________________________________________________________________________________________________
dense_2 (Dense)                 (None, 256)          65792       add_1[0][0]
__________________________________________________________________________________________________
dense_3 (Dense)                 (None, 1652)         424564      dense_2[0][0]
==================================================================================================
Total params: 1,813,268
Trainable params: 1,813,268
Non-trainable params: 0
__________________________________________________________________________________________________
- plot_model을 사용하면 Model을 구조를 이해하기 쉽게 그려줍니다. ( 개꿀 ! )
from keras.utils import plot_model
plot_model(model, 'model_structure_info.png', show_shapes=True)
- model.layers[2]는 Pre-Trained Word Embedding Layer이기 때문에 Back Propagation 시에 Weight가 Update
되지 않도록 Freeze시킨다.
model.layers[2].set_weights([embedding_matrix])
model.layers[2].trainable = False
- Loss Function은 분류문제이기 때문에 Categorical Crossentropy로 하고, Optimizer는 Adam으로 했습니다.
model.compile(loss='categorical_crossentropy', optimizer='adam')
- Epoch은 우선 10회로 정하고 시작하겠습니다.
- Generator는 무한히 Data를 생성하므로 적당한 선에서 중지해야 합니다.
epochs = 10
number_pics_per_bath = 3
steps = len(train_descriptions)//number_pics_per_bath
- TQDMNotebookCallback은 Notebook으로 Train 진행 상황을 볼 때 유용하더라구요.
- 사용법은 fit 함수의 Callback에 등록해서 사용하시면 됩니다.
from keras_tqdm import TQDMNotebookCallback

for i in range(epochs):
    generator = data_generator(train_descriptions, train_features, wordtoix, max_length, number_pics_per_bath)
    model.fit_generator(generator, epochs=1, steps_per_epoch=steps, verbose=0, callbacks=[TQDMNotebookCallback()])

    print(i)
    model.save('model_weights/model_' + str(i) + '.h5')
for i in range(epochs):
    generator = data_generator(train_descriptions, train_features, wordtoix, max_length, number_pics_per_bath)
    model.fit_generator(generator, epochs=1, steps_per_epoch=steps, verbose=0, callbacks=[TQDMNotebookCallback()])

    print(i)
    model.save('./model_weights/model_' + str(i) + '.h5')
- Learning Rate를 조금 더 작게해서 한 번 더 Train하겠습니다.
model.optimizer.lr = 0.0001
epochs = 10
number_pics_per_bath = 6
steps = len(train_descriptions)//number_pics_per_bath
for i in range(epochs):
    generator = data_generator(train_descriptions, train_features, wordtoix, max_length, number_pics_per_bath)

    model.fit_generator(generator, epochs=1, steps_per_epoch=steps, verbose=0, callbacks=[TQDMNotebookCallback()])
    print(i)
- Train을 마친 Model을 나중을 위해서 저장하도록 하겠습니다.
model.save_weights('./model_weights/model_30.h5')
Inference
- 이제 Train을 마쳤습니다.
- 실제로 Train을 마친 Model을 이용해서 우리가 원하는 Image의 Caption을 생성해 보도록 하겠습니다.
- 우선 Image를 VGG16 Model에 넣어서 Feature를 뽑아냅니다.
- 그 Feature들과 Caption의 시작을 알리는 ‘startseq’라는 문자열을 우리가 훈련한 Model에 넣으면 전체 Caption이 만들어지는 방식이니다.
model.load_weights('./model_weights/model_30.h5')
def greedySearch(photo):
    in_text = 'startseq'
    for i in range(max_length):
        sequence = [wordtoix[w] for w in in_text.split() if w in wordtoix]
        sequence = pad_sequences([sequence], maxlen=max_length)
        yhat = model.predict([photo,sequence], verbose=0)
        yhat = np.argmax(yhat)
        word = ixtoword[yhat]
        in_text += ' ' + word
        if word == 'endseq':
            break
    final = in_text.split()
    final = final[1:-1]
    final = ' '.join(final)
    return final
z = 1
pic = list(encoding_test.keys())[z]
image = encoding_test[pic].reshape((1,2048))
x=plt.imread(images+pic)
plt.imshow(x)
plt.show()
print("Greedy:",greedySearch(image))
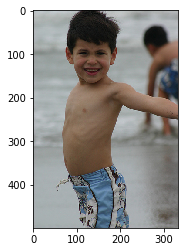
Greedy: young boy in blue swim trunks is running in the water
- 꽤 그럴싸하게 Caption을 만들어 내네요.